
It’s euphoric and thrilling to achieve perfectly aligned tiles with the neighboring piece, but there is achieving flawless symmetry of tiles seems impossible without practicing some norms of how to grout uneven tiles.
Once you purchase mosaic tile along with coordinating tile it seems exactly of the same size but after installation, it may create trouble because the dimensions of certain styles of tiles are differentially same, and you have to adjust the size disagreement of different tiles.
In this article, the most demanded potential keyword is how to grout uneven tiles. That targeted so less.
If you are thinking of starting a tiling job or you are in between applying grout to the uneven tiles before stepping into grouting you didn’t have the idea of the space mess you receive during adjusting tile.
In both situations, this article will drive you out of this problem by guarding you, your time, money, and the aesthetic of your tiling.
Let’s uncover together.
Let’s do it in chunks of steps:
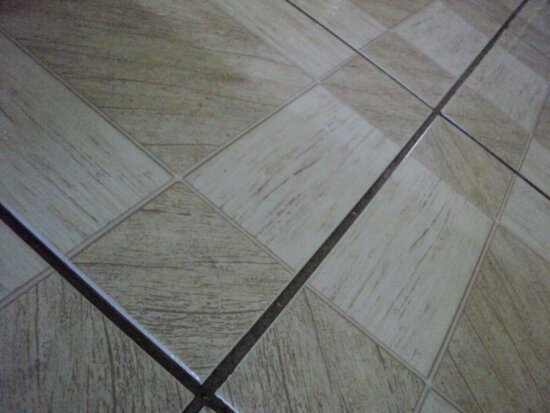
What Are Uneven Tiles?
Uneven tiles, also known as lippage, are tiles that have not been installed completely level with each other. This can happen when tiles are installed on top of an uneven surface or when they have not been fitted correctly.
Uneven tiles can create an unsightly appearance and give a room a cluttered, unprofessional look. Fortunately, if you know how to grout uneven tiles properly then it’s easy to get them looking great again!
How to Grout Uneven Tile
1. Gearing up the Area by Preparing it up
Gather Necessary Tools and Materials: To start, gather all the necessary tools such as a grout float, grout sponge, bucket, and protective gear (gloves and goggles). Also, prepare the grout as per the manufacturer’s instructions.
Remove Old Grout: If you’re re-grouting, use a grout removal tool to scrape out the old grout from between the tiles. Be careful not to damage the tiles.
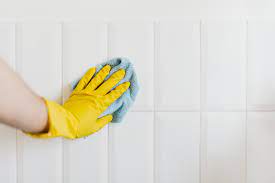
Clean the Tiles: Use a vacuum cleaner or a damp cloth to clean any dust or debris from the tiles. This step is crucial for a smooth grouting process.
Dry the Tiles: Allow the tiles to dry completely. Any moisture can adversely affect the grouting process.
Tape-Off Areas: Use painter’s tape to protect the surfaces around the tiles that you don’t want to be grouted.
2. Plump for Color nearly Matches Tiles
To reduce untidy or uneven surfacing pick a color that coheres with your tile to compose a calm symphony soothing to the eyes.
Religiously follow the instructions on the packaging while mixing the grout in a bucket.
Go swiftly and quickly to apply the grout knowing the fact that the grout begins to settle in about 30 minutes. With the help of a drywall knife or trowel start applying grout between cracks.
3. Spread a Necessarily even layer of Grout on Even or Uneven Tiles
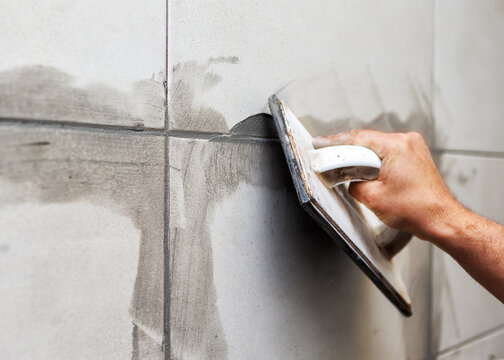
By hitting horizontal shots lay out the grout by straightening it out. Never work out simultaneously more than 3-foot sections.
Always throw the strokes in small segments. Pitching perpendicular strokes revise the process considering the uneven tiles, and fits in more grout in the margins as per requirement.
Just in case the uneven tiles are not filled appropriately with grout, it is time to play a reverse sweep shot.
It is completely alright to have the grout on the tiles surely it is not a foul but a part of the game.
Tips for Dealing With Uneven Surfaces
Dealing with uneven surfaces while grouting can be a bit tricky, but here are some tips to help you navigate the process:
Use Flexible Grout: Flexible grout is perfect for uneven tiles as it can accommodate variations in tile depths. This grout type is less liable to crack or crumble under the pressure of uneven surfaces.
Consider Using a Grout Bag: A grout bag, similar to a cake frosting bag, can offer better precision when applying grout to uneven surfaces. It allows for targeted application, reducing mess and wastage.
Application Technique: Apply the grout diagonally across the tiles to make sure it fills the spaces between all tiles, even if they’re uneven.
Smooth the Grout: After grouting, use a damp sponge to smooth the grout lines. Remember to rinse the sponge frequently for a cleaner finish.
4. Wiping off the Residue from Tiling Surface
Keep in mind that wiping off the excess grout only swept away the grout on the surface of the tile not in between the cracks of tiles. Use a damp cloth to cleanse the tiling surface.
After cleaning the whole surface rinse the cloth and remop until you get a satisfactory signal that all the residue of grout is erased from the tiled surface.
You will feel pleasant to read that, all the linear cracks can be evenly filled with grout since your tiles don’t get a serious injury.
The sight imparities can be lessened through seamless grout lines. Some patterns like the checkerboard pattern may look ordinarily uneven.
5. Allow the Grout to Set
Allowing the grout to properly dry is crucial in ensuring a durable and clean finish. The drying time can vary depending on the type of grout used, the temperature, and the humidity level. As a rule of thumb, most grout should be left to dry for at least 24 to 48 hours before sealing.
During this time, avoid any foot traffic or allow the area to get wet. This step requires patience, but it is vital for the longevity and effectiveness of your grouting project.
After the grout has fully dried, you should notice a powdery haze on the tile surfaces – this is normal and can be cleaned off in the next step.
6: Seal the Grout
Applying a grout sealer is a crucial step in the tiling process because it provides a protective layer that keeps your grout looking fresh and new.
It’s essential to choose a sealer that is suitable for your specific type of grout and tile. Before application, ensure that the grout surface is clean, free of dust, and completely dry. Use a foam brush or a sealer applicator bottle to apply the sealer, ensuring even coverage.
Carefully apply the sealer over the grout lines, avoiding the tile surfaces. After the initial application, wait for about 5 to 10 minutes, then wipe off any excess sealer with a clean, lint-free cloth.
Let the sealer dry for the manufacturer’s recommended time, usually around 24 to 72 hours. After this period, your grout is protected and ready for everyday use. Remember, grout sealer isn’t a one-time application; it should be reapplied every 1-2 years to maintain its effectiveness.
How to Avoid Disasters?
Some Grout Problems must be addressed in order to achieve perfect symmetric alignment of tiling.
Grout and Glass Mosaic Tiles:
- Have you ever gone through that problem?
Many novices report that after spending potential hours or days on gluing tiles they all begin pulling off when the grout is applied.
Some grouts are not capable of linking the tiles together and crumbling. Some tips to save your mosaic tiles from devastating.
- Before wasting hours and hours in the race of achieving perfect tiling test the adhering of your grout on one or two glass mosaics.
The adhesive is good at sticking glass or the surface underneath or bad you will have a perfect idea about its capability. You need to wait overnight to test the tile to cure.
Try prying it off in the morning. (Must wear safety glasses to secure yourself from tile splinter).
- Before grouting on tumbled stone and unglazed ceramic tiles seal the tiles as they are porous. It will save you a day by preventing the grout from spotting or staining on the porous surfaces.
If you are grouting glass mosaic tiles this step is not needed because smooth glass is nonporous.
- Let the glue sit for 24 hours before grouting.
- It is necessary to use unsanded grout for gaps greater than 1/8″.
- Grout requires reinforcing analogously that concrete in roads is reinforced along with gravel and iron bar is concrete. This keeps the grout safe from collapsing.
- The varieties in mosaic glass tiles are generally flat however ensure that the surfaces of mosaic tiles are proportionally level.
Because some of the artistic mosaic surfaces are not smooth namely mosaic vases. It is administered to have Corners of tiles stick out. While applying damp grout be potentially gentle with these in order to preserve tiles from knocking-off.
One fact to keep in mind cupboard about wet grout is that it may unfasten the water-based adhesives.
It is recommended to cut the tiles in appropriate segments to get an effortless job on rounded surfaces.
- Be mindful of the consistency of grout dough it should be unyielding. Follow the manufacturer’s instructions while mixing the grout. Never add all the water needed at one time add accordingly. A good grout dough never applies unevenly.
- To apply the grout evenly, smoothly, and more importantly as desired, keep in mind that grout is exactly near any other concert don’t let it dry out as it cures. It is clotted by hydration, not dehydration. If needed mist LIGHTLY with a spray bottle after an hour. Don’t spray or drizzle.
- The right method to apply the grout is to fill it into the gaps with the assistance of a spatula, trowel, or rubber glove.
Grout should be pressed down to achieve an even look of tiling excessive dough should be removed. Take a damp sponge not dripping wet and make the replicate pass. Before replicating the process as per need rinse the sponge thoroughly.
If the margins between the tiles are uneven or too large the key is to solve the mess to repeat the passes more frequently with intensive focus and control.
- To avoid Sharpe edges that look immensely bad, don’t abrade the wet grout from the margins.
- You may find some residue or daze on the surface of the tiles that looks uneven, a day after the event of grouting. Burn away the wastage artistically with the help of a clean dry cloth. The task of evenly grouting the “HAZING” is the last step.
Related Topics:
Conclusion
Grouting is an essential part of any tiling job, regardless of the type of tiles you are using. When it comes to uneven tiles, the grouting process is even more important as it will help to level out the surface and give a neat, professional finish.
With careful preparation and the right tools and materials, you can easily learn how to grout uneven tiles. Good luck with your next grouting project!
FAQs
Q: What tools do I need to grout uneven tiles?
You will need a trowel, rubber float, bucket of water, sponge, and grout sealer.
Q: How long does it take for the grout to dry?
Grout typically takes 24 hours or more to fully dry. The drying time will depend on the type of grout you are using and the environmental conditions.
Q: Do I need to seal the grout?
Yes, it is important to use a grout sealer after the grout is dry to protect it and ensure it lasts longer. Be sure to follow manufacturer instructions for best results.
2 thoughts on “6 Flawless Steps Grout Uneven Tiles: Avoid Disasters!”