
Laminate flooring has become a popular choice for many homeowners due to its durability, ease of installation, and cost-effectiveness. An essential consideration when selecting laminate flooring is whether to opt for options with an attached pad or without.
Flooring with an integrated pad simplifies the installation process and provides additional sound insulation, enhancing the comfort of your living space.
On the other hand, opting for laminate flooring without a pad provides the flexibility to select tailored underlayment options that align exactly with individual requirements. This could involve prioritizing features like enhanced moisture resistance for areas prone to dampness or selecting underlayment with extra cushioning for added comfort underfoot.
In this comparison, we will explore the pros and cons of laminate flooring with a pad versus without, helping you make an informed decision that aligns with your home renovation goals.
Laminate Flooring With Pad
Pros
Integrated Padding for Easy & Quick Installation
Integrated padding in laminate flooring refers to a pre-attached underlayment layer. This feature is a game-changer for many DIY enthusiasts and professional installers alike as it significantly reduces the installation time.
The ease stems from eliminating the need to measure, cut, and lay separate underlayment, which not only speeds up the process but also decreases room for error.
Additionally, integrated padding ensures a consistent barrier for sound reduction across the flooring, creating a more uniform and quieter walking experience. This can be especially beneficial in multi-story buildings where foot traffic noise can be an issue.
With the pad already attached, you can enjoy the dual benefits of efficiency and improved sound insulation right out of the box.
Provides Sound Dampening For A Quieter Environment
Laminate flooring with a built-in pad can make your home quieter by reducing noise. It’s great for busy areas or homes with multiple floors that can amplify footstep sounds.
The padding acts as a sound barrier, absorbing and mitigating the transmission of noise between floors.
This sound-dampening quality is an important consideration for homeowners who value a serene living space.
It reduces echoes and the hollow sound often associated with hard surface flooring, contributing to a more solid, muted walking experience that is less disruptive within the household.
Adds Insulation, Boosting Energy Efficiency
In addition to its sound-dampening capabilities, the padding integrated with laminate flooring also offers some level of thermal insulation.
This extra layer helps in maintaining a stable temperature within the home, potentially reducing the need for excessive heating during cooler months and air conditioning in warmer climates.
The result is not just a more comfortable living space, but also energy savings over time. Homeowners mindful of energy costs and environmental impact will appreciate the dual functionality of their flooring choice.
Cons
Possibly Limited Pad Thickness or Quality
While laminate flooring with pre-attached padding brings convenience and some performance benefits, it may also come with a limitation in the selection of pad thickness and quality.
The pre-attached underlayment is generally standard, and homeowners looking for a specific thickness or higher-quality sound and thermal insulation might find the options somewhat restrictive.
This means that the integrated padding may not meet the needs of those who require a specialized underlayment for superior comfort or to meet stringent soundproofing requirements.
Needs Full Flooring Replacement For Pad Problems
A significant downside to laminate flooring with pre-attached padding is that issues within the pad require replacing the entire floor.
Since the padding is an integral part of the unit, you cannot simply remove and replace it. This design feature can lead to increased costs and inconvenience should the padding fail or become less effective over time.
This consideration is crucial for those prioritizing long-term durability and ease of maintenance in their flooring choices.
Usually More Expensive Upfront Than Buying Padding Separately
Another potential drawback is the cost consideration. Laminate flooring with pre-attached padding is often more expensive upfront compared to purchasing laminate and separate underlayment.
Homeowners on a budget may find that the initial savings of a lower-priced laminate without padding, plus the cost of separate underlayment, could make more financial sense, especially if they are not averse to a little extra installation work.
Laminate Flooring Without Pad
Pros
Flexibility to Choose Specific Underlayment Based on Needs
Choosing laminate flooring without padding already attached lets homeowners pick the right underlayment for their needs.
Whether you want thicker material for comfort, better sound insulation, or moisture protection, buying underlayment separately allows customized solutions to improve flooring performance and feel.
Potential for Higher Quality Soundproofing and Insulation
Purchasing underlayment separately also opens the door to higher-quality options in soundproofing and insulation.
This can be a significant advantage for those living in multi-story buildings or homes where noise reduction is a priority.
High-quality underlayment materials can dramatically minimize the sound of footsteps and provide a level of acoustic comfort that pre-attached padding might not offer.
Additionally, the right underlayment can serve as an extra insulating layer, contributing to improved energy efficiency and warmth underfoot.
Easier to Replace or Upgrade Underlayment Independently of the Flooring
The separate purchase of underlayment allows for easier replacement or upgrading without having to remove the entire flooring.
This is beneficial when the underlayment wears out or if there’s a desire to upgrade to a more advanced product in the future.
It’s a cost-effective strategy for homeowners who anticipate the need for enhanced features or who prefer to keep their options open for improvements down the line.
Durability
One advantage of Laminate Flooring Without Pad is its durability. The thick layer of laminate on top of the core material makes it resistant to scratches and dents, making it perfect for high-traffic areas or households with pets and children.
This feature also makes it easy to maintain and keep clean, as spills and stains can be easily wiped away without causing damage.
With its long-lasting nature, Laminate Flooring Without Pad is a cost-effective option for homeowners looking for a durable flooring option that will withstand everyday wear and tear.
Plus, the lack of a pad means that installation is quicker and easier, saving both time and money.
Cons
Additional Step in the Installation Process
Installation of separate underlayments involves an extra step, effectively extending the duration of the flooring project.
This added phase requires setting aside more time for proper placement and securing of the underlayment before the actual flooring can be installed, which could be a deterrent for those seeking a quick renovation turnaround.
Challenges in Alignment During Installation
Aligning underlayment with the flooring material during installation poses inherent challenges. Misalignment can lead to imperfections in the flooring surface, resulting in potential issues like unevenness or increased wear and tear.
Proper alignment is crucial to ensure a smooth and professional-looking finish.
Extra Costs for Separate Underlayment
While purchasing underlayment independently allows for customized choices, it introduces additional expenses.
Homeowners must budget not only for the flooring but also for the separate underlayment, which can be significant depending on the quality and type of underlayment chosen.
This extra cost factor is an important consideration when planning the overall budget for flooring projects.
Related Topics:
Installing Laminate Flooring with Pad
Tools and Materials Needed
- Laminate flooring
- Underlayment pad
- Tape measure
- Saw (hand saw, circular saw, or miter saw)
- Spacers
- Tapping block
- Pull bar
- Hammer
- Utility knife
- Safety equipment (gloves, goggles)
Preparation
Clearing the Room
Before beginning the installation process, it is imperative to remove all furniture, rugs, and movable objects from the room to create a clear workspace.
This ensures easy access to the entire floor, prevents potential damage to belongings, and provides safety during installation.
Cleaning the Floor
Before laying down underlayment and laminate flooring, thoroughly clean the subfloor to remove any dust, debris, or particles.
A clean surface is essential for the proper adherence of the underlayment and to prevent any irregularities in the flooring above it.
Checking for Evenness
It is necessary to inspect the subfloor for evenness using a level. Any significant dips or rises can cause problems after the laminate flooring is installed, such as creaking or even cracking of the planks. If unevenness is found, it should be addressed before continuing.
Removing Baseboards
Carefully remove baseboards and trim to allow the laminate flooring to fit snugly against the walls. This step is crucial for a seamless edge and to ensure expansion gaps are consistent around the perimeter of the room.
Calculating the Amount of Flooring and Underlayment Needed
Measure the room to determine its square footage, which will inform how much laminate flooring and underlayment is needed.
Always purchase a little extra to account for mistakes or damaged pieces during installation. This foresight can prevent delays if additional materials are required.
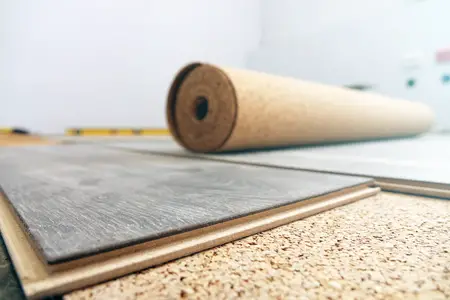
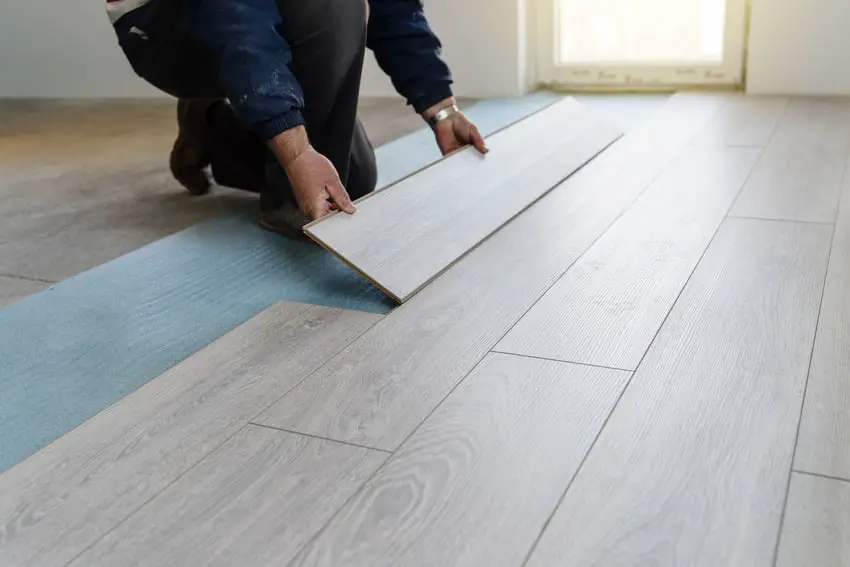
Installing the Underlayment Pad
Rolling out the First Row
Begin the underlayment installation by rolling out the first row of padding along the longest wall of the room. Ensure that the underlayment is laid flat and straight, with no wrinkles or folds that could affect the laying of the laminate.
Trimming to Fit
As you approach the end of the wall, trim the underlayment to fit using a utility knife.
Cut carefully, keeping the underlayment tight to the wall to ensure a precise fit that will help maintain a professional finish.
Taping Seams Together
After laying the first row, proceed by connecting the next strip of underlayment. Make sure the edges meet without overlapping.
Use special underlayment seam tape to secure the seams, which will prevent shifting and maintain a continuous barrier against moisture.
Laying the First Row of Laminate
Measuring and Cutting the First Piece
To initiate the placement of laminate planks, measure the length of the first wall. Then, cut the first plank according to these measurements, ensuring that the cut end will be against the wall when you start laying the flooring.
This cut piece can help you maintain the necessary expansion gap and achieve a more precise layout for the remaining planks.
Positioning the First Plank with Spacers
Place the first plank with the finished side up and the cut side against the wall. Insert spacers between the plank and the wall to maintain the expansion gap.
This gap is critical for the natural expansion and contraction of the flooring due to changes in humidity and temperature.
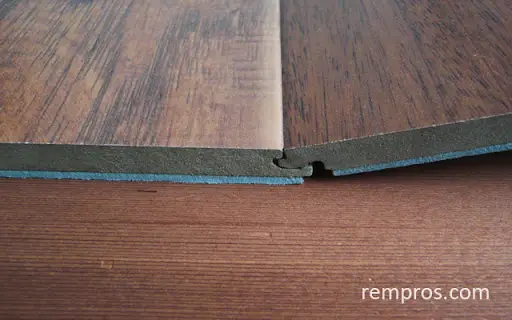
Connecting Subsequent Planks
Angle the next plank so that its tongue edge aligns with the groove of the already positioned plank. Firmly press down and forward until the plank locks into place.
Ensure that the joints are tight and seamless. Continue this process to complete the entire first row whilst being mindful to stagger the seams.
Cutting the Final Plank to Fit
When you reach the end of the first row, measure the gap between the last fitted plank and the wall. Subtract the expansion gap width from this measurement and cut the final plank to fit.
Remember, the cut end should be facing the wall, and once positioned, insert spacers to maintain the consistent expansion gap.
Subsequent Rows
Staggering the Joints
To ensure a visually appealing and structurally sound floor, it is crucial to stagger the joints of the laminate planks. Stagger the joints by starting subsequent rows with the offcut from the previous row, as long as it’s at least 12 inches long.
This variation in the seam placement will enhance the floor’s overall strength and will mimic the look of real wood flooring.
Locking the Planks Together
Each new plank should be angled and inserted into the groove of the plank beside it. Apply gentle pressure downwards and forwards to lock the planks securely together.
The planks should click into place, confirming a tight lock. If a plank does not lock properly, do not force it; instead, check for debris in the groove and ensure proper alignment.
Using Tapping Block and Pull Bar as Needed
A tapping block can be used to ensure that the planks fully engage without damage. Place the tapping block against the edge of the plank and tap lightly with a hammer to secure the joints.
For the planks close to the wall, a pull bar may be needed to pull the planks into alignment and lock each piece together without damaging the tongues or grooves.
Maintaining Expansion Gaps
As you lay each row, continue to use spacers along the edges to maintain the necessary expansion gap.
This space prevents warping or buckling as the laminate flooring expands and contracts with temperature and humidity changes. Keep a consistent gap as specified by the flooring manufacturer around the room’s perimeter.
Finishing Up
Installing the Last Row
To accommodate the wall, the final row of planks may need to be trimmed lengthwise. Measure the gap, subtract the expansion gap width, and see the planks accordingly.
Ensure that the cut edge is towards the wall and the factory edges lock with the previous row for a seamless finish.
Fitting Planks Around Obstacles
When encountering obstacles such as pipes or fixtures, measure and mark the plank to be cut. Use a jigsaw or hole saw to make precise cuts for a snug fit.
Remember to leave appropriate expansion space around the obstacles to prevent buckling.
Reattaching Baseboards
Once all the planks are laid down, baseboards can be reattached. Nail the baseboards to the walls, not to the flooring, to allow for proper floor movement under the baseboard.
Caulk the top of the baseboards, if necessary, for a finished appearance.
Transition Strips at Doorways
Install transition strips at the doorways to bridge the gap between different types of flooring or to cover the expansion gaps.
Choose a strip that complements both the laminate flooring and the adjoining floor material for a cohesive look.
Final Cleanup and Inspection
Remove all spacers from the perimeter and vacuum up any sawdust or debris. Inspect the floor for any uneven seams or planks that may not be fully engaged.
A final mopping can be done using a laminate-safe cleaner to give the floor a pristine finish.
Installing Laminate Flooring without a Pad
Materials and Tools
- Laminate planks
- Spacers
- Tapping block
- Pull bar
- Appropriate saw (handsaw, jigsaw, circular saw, or table saw)
- Rubber mallet
- Utility knife
- Measuring tape
- Safety glasses
- Dust mask
- Marking pencil
Measuring the Space
Before beginning the installation, it is crucial to calculate the room’s square footage to determine how much laminate flooring is needed. Measure the length and width of the room and multiply these figures to find the total square footage.
Remember to add 10% to the total to account for waste and mistakes.
When planning your layout, try to avoid having narrow plank widths at the edges of the room, which can make the installation look unprofessional and may not wear evenly over time.
If your measurements suggest that you’ll end up with narrow pieces, adjust the layout by slicing a bit off the width of the planks at the starting side of the room.
Acclimation
Allow the laminate planks to acclimate to the environment of the room for at least 48 hours before installation.
This crucial step ensures that the flooring adapts to the temperature and humidity levels present, reducing the likelihood of expansion or contraction post-installation.
Stack the laminate packages in flat rows, away from exterior walls, and not directly upon concrete if laying over it this helps prevent any potential moisture-related issues.
Installation Start Point
The ideal starting point for laying your laminate flooring is typically adjacent to the longest wall or the main wall in the room.
This approach often leads to a more aesthetically pleasing finish as it provides a straight and continuous flow that complements the room’s dimensions.
Begin by placing spacers along this wall to maintain a consistent expansion gap. This gap is essential as it allows the flooring to expand and contract with changes in temperature and humidity without warping or buckling.
Ensure that the spacers are evenly distributed every few feet to keep the first row of laminate planks perfectly aligned.
Laying the First Row
When preparing to lay the first row, carefully measure the length of your starting wall and calculate the length of the first plank to ensure a balanced look around the perimeter of the room.
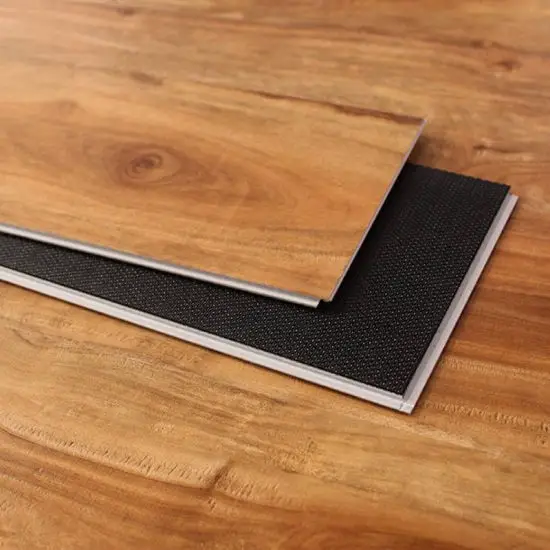
If cutting the plank is necessary, do so with precision, using the appropriate tools to achieve a smooth edge. When you begin laying the planks, make sure the side with the adhesive strip is positioned toward the wall.
This orientation is critical for the first row because it provides a strong anchor point for the rest of the floor.
In addition, the adhesive side will typically face away from the main entrance, creating a seamless look as one enters the room. Gently press the planks against the spacers and ensure that they are perfectly aligned and securely in position before proceeding to the next.
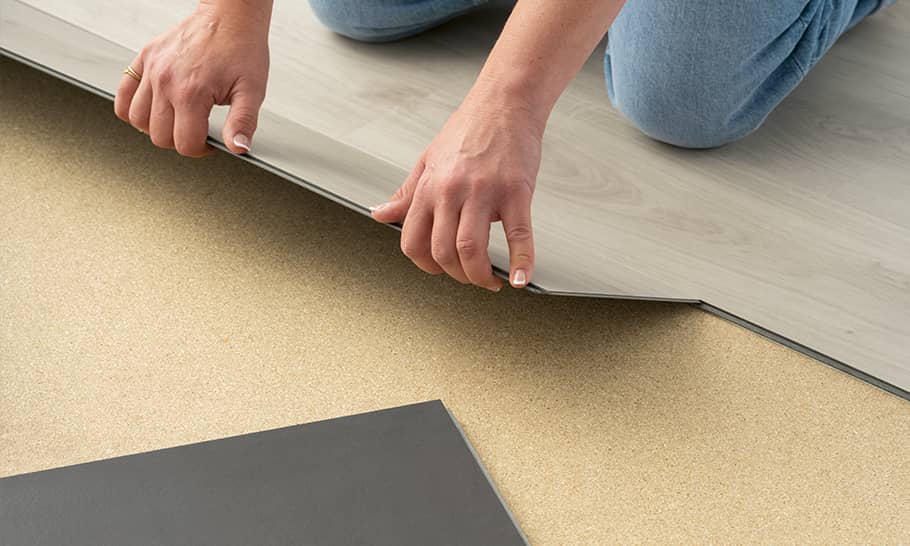
Clicking Planks into Place
To continue with the installation, take each laminate plank and align it along the short side of the previously laid plank, then angle and click it into place.
This technique should be done gently yet firmly to ensure a snug fit. As you reach the end of the row and find the space too tight for a full plank, use a pull bar to maneuver it into position.
This tool will allow you to fit the last plank securely against its neighbor without causing damage to the interlocking mechanism. It’s crucial to do this carefully to maintain the integrity and uniformity of the floor’s appearance.
Staggering the Seams
Staggering the seams as you lay each successive row is a crucial step in achieving a professional and aesthetically pleasing finish.
This process involves ensuring the end joints of the planks do not line up across adjacent rows. Ideally, aim for a random pattern, similar to that seen in a natural hardwood floor, which not only enhances the look but also contributes to the overall structural stability of the flooring.
As you progress with installation, you will encounter various obstacles such as door frames, pipes, and fixtures.
For doorways, you might need to undercut the trim to allow the plank to slide underneath seamlessly. Pipes and other fixtures require precise measurements for drilling holes or cutting shapes into the plank to accommodate them.
Ensure the cutout areas for pipes are slightly larger than the pipe’s diameter to allow for expansion and use pipe collars for a neat finish.
Carefully measured and custom-cut planks ensure that your flooring appears continuous and professional, nimbly accommodating the uniqueness of your space.
Final Row and Finishing Touches
When approaching the final row of your flooring project, precision measurement becomes key. Measure the gap between the wall and the last full row laid, accounting for the necessary expansion gap, typically 1/4 inch to 3/8 inch.
You will need to trim the planks accordingly. This can be done using a table saw or handsaw, ensuring the cut edge is facing the wall. As you complete the installation of the final row, remember to use a pull bar just as you did at the start to ensure the planks are snugly secured.
Transition strips at doorways and thresholds are installed to cover the expansion gaps and to provide a smooth visual transition between different types of flooring.
These should be affixed carefully according to the manufacturer’s instructions. Once the floor is laid, you can proceed to replace the baseboards to their original position or install a new set of quarter-round moldings.
This not only covers the expansion gaps around the perimeter of the room but also provides a finished look to the project.
Finally, with the installation complete, remove any spacers used, and give the new floor a thorough cleaning with a soft, damp mop to remove any leftover debris or dust.
Now, the room is ready, and you can begin to move the furniture back into space, basking in the beauty of your newly installed floor.
Conclusion
As our guide concludes, we emphasize the importance of attention to detail and patience throughout the installation process. Ensuring a smooth and secure flooring installation can significantly affect your space’s look, feel, and longevity.
Whether to opt for padding beneath your flooring comes down to personal preference and the specific requirements of your living space.
Padded flooring can offer sound dampening and a softer underfoot feel, which can be beneficial in high-traffic areas and upper stories where noise reduction is essential.
On the flip side, non-padded flooring might provide a more direct and firm feel underfoot, which some homeowners prefer. Ultimately, the best option depends on your situation and the qualities you value most in your home’s flooring.
1 thought on “Laminate Flooring With Pad vs Without: Installation Guide”