

Desert land flooring is an increasingly popular choice for homeowners seeking a unique, durable, and aesthetically pleasing solution for their flooring needs.
Renowned for its earthy hues and resilience to high-traffic wear, it is an ideal choice for both high-traffic areas and cozy personal spaces.
This guide will provide you with a step-by-step process on how to install desert land flooring, ensuring you can enjoy its beauty and functionality in your own home.
Desert land flooring is inspired by the rugged charm and natural beauty of deserts. This type of flooring mimics the earthy tones and textures found in arid environments, creating a warm and inviting atmosphere.
Made from durable materials that withstand the test of time, desert land flooring is resistant to scratches and dents, making it a practical choice for both residential and commercial spaces.
Its low maintenance requirements and high durability make it an excellent choice for those who want a stylish yet functional flooring solution.
Advantages of Desert Land Flooring
- Durability: Desert land flooring is extremely durable, resisting scratches and wear from high traffic. This makes it a long-lasting choice for any space.
- Aesthetics: With its earthy hues and natural textures, desert land flooring imparts a warm and inviting atmosphere to any room.
- Low Maintenance: Unlike some other types of flooring, desert land flooring requires minimal maintenance, making it a practical choice for busy households or commercial spaces.
- Versatility: Suitable for both residential and commercial applications, desert land flooring offers a versatile solution for a variety of spaces.
- Eco-Friendly: Often made from sustainable materials, desert land flooring is an environmentally conscious choice for your flooring needs.
Materials and Tools Required
Before embarking on your desert land flooring installation, ensure you have gathered all necessary materials and tools. Below is the list:
- Desert Land Flooring Planks: These are the actual flooring planks you will install. Ensure you have enough to cover your entire floor area, including some extra for waste and replacement pieces.
- Underlayment: This is used to create a smooth, flat surface for your flooring. It also provides added insulation and noise reduction.
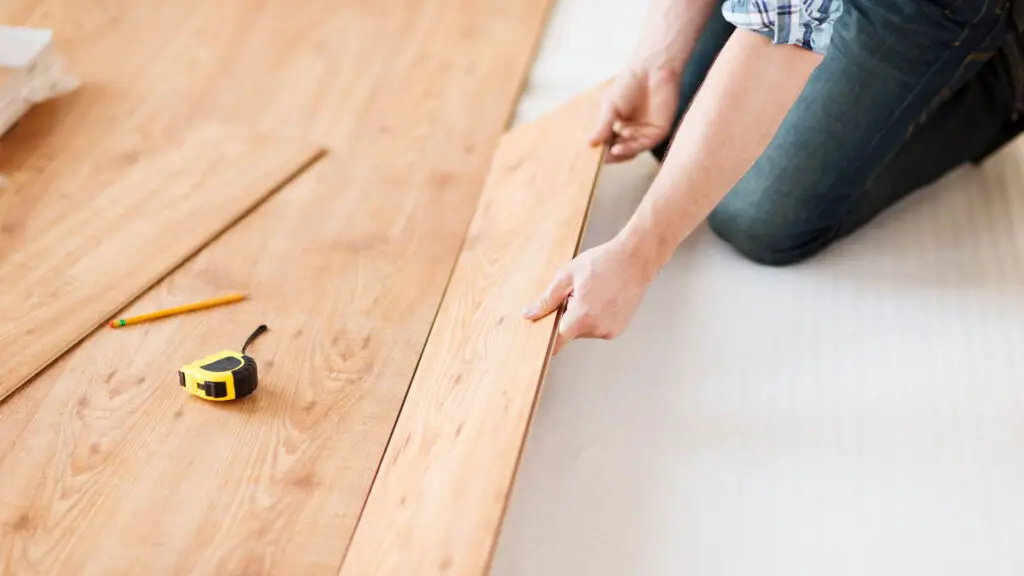
- Tape Measure: You will need this to measure your floor area and cut your planks to the correct size.
- Saw: A saw is necessary for cutting your flooring planks to the correct size.
- Level: This tool ensures your flooring is perfectly horizontal and even.
- Adhesive: This is used to secure the flooring planks to the underlayment.
- Trowel: A trowel is used to spread the adhesive evenly.
Spacers: These are used to ensure a consistent gap between the flooring and the wall, which allows for expansion and contraction.
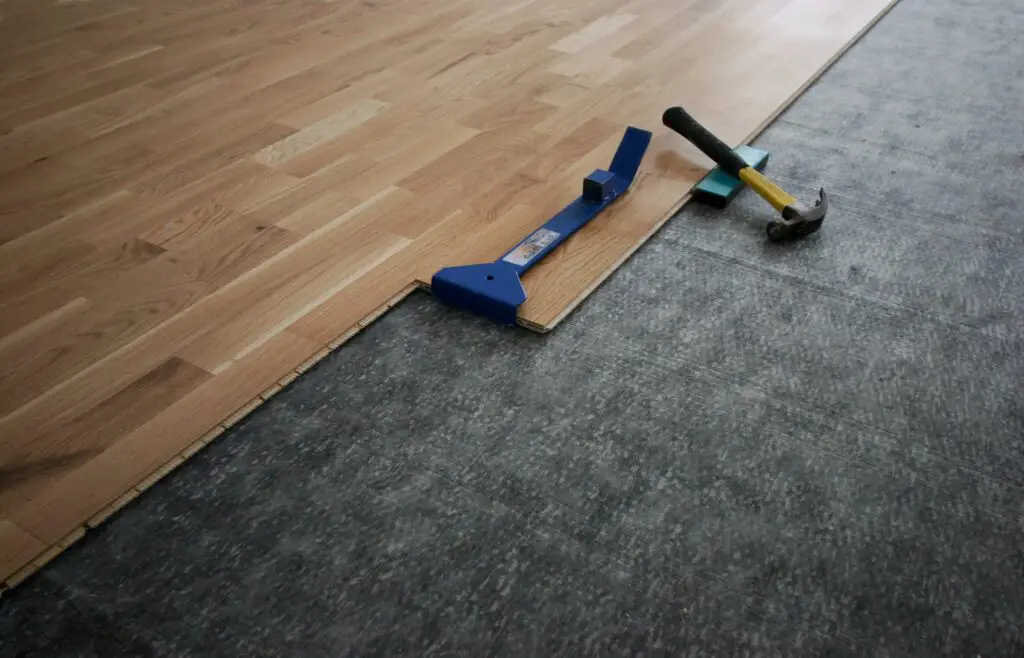
Rubber Mallet: This helps to fit the planks snugly together without damaging them.
Pull Bar: A pull bar is used to fit planks in tight spots, such as against the wall.
Additional Tools Required for Installation
In addition to the aforementioned tools and materials, here are a few more tools that might come in handy during the installation of your desert land flooring:
- Knee Pads: Installation can be tough on your knees. Consider using knee pads for added comfort and protection.
- Chalk Line: A chalk line can help ensure your first row of planks is straight, which is critical for a successful installation.
- Utility Knife: This may be used to trim the underlayment or to cut open packaging.
- Pry Bar: If you need to remove any existing floor trim or baseboards, a pry bar can be a very useful tool.
- Safety Glasses: Always prioritize safety. Use safety glasses to protect your eyes when cutting and installing the flooring.
- Gloves: To protect your hands from cuts or scratches during installation, consider using gloves.
- Dust Mask or Respirator: To prevent inhalation of dust or particles generated during the cutting process, use a dust mask or respirator.
Preparation Steps
Cleaning and Inspection of the Installation Area

Before commencing the installation of your desert land flooring, it’s vitally important to thoroughly clean and inspect the installation area.
Remove any debris, dust, or dirt, as these can interfere with the adhesion process. Inspect the floor for any holes or cracks and repair them as necessary.
The floor must be level for a successful installation, so if there are any irregularities, these should be addressed using a self-leveling compound.
Measurement and Calculation of the Floor Area
The next step in preparing for installation is to accurately measure and calculate the floor area. This vital step ensures that you purchase the correct quantity of desert land flooring.
Measure the length and width of the room, then multiply these figures together to yield the total square feet or meters.
Always add a bit extra (around 10%) to account for cut-offs and waste during installation. This precaution ensures you won’t run short of materials mid-installation.
Installation of Underlayment
Selection and Importance of Underlayment
Selecting the right underlayment for your desert land flooring is a critical part of the installation process. The underlayment serves multiple crucial functions that contribute significantly to the longevity, comfort, and effectiveness of your flooring.
Firstly, underlayment provides a smooth, even surface for the flooring to be laid upon, helping to eliminate minor subfloor imperfections.
This ensures that your desert land flooring will be flat and level, enhancing its aesthetic appearance and preventing any uneven wear or damage over time.
Secondly, underlayment acts as a moisture barrier, protecting the desert land flooring from damage due to moisture seepage from the subfloor.
This is especially important in areas like basements or ground floors where the floor can be in direct contact with the earth.
Thirdly, underlayment offers thermal insulation, helping to keep your rooms warm in winter and cool in summer. This increases the energy efficiency of your home and can help save on energy costs.
Lastly, a quality underlayment reduces noise transmission, creating a quieter environment. This is particularly useful in upper-story rooms or in multi-story buildings where sound can easily travel between floors.
When choosing underlayment for your desert land flooring, consider factors such as the type of subfloor you have, the room’s moisture exposure, and the level of foot traffic the floor will endure.
Investing in a good quality underlayment can enhance the feel and lifespan of your desert land flooring, making it a worthy part of the installation process.
Steps to Install Underlayment
Measure and Cut:
Start by measuring the room to determine how much underlayment you will need. Remember to add a bit extra to account for any mistakes or unforeseen issues. After you have your measurements, use a sharp utility knife to cut the underlayment to size.
Position the Underlayment:
Roll out the first sheet of underlayment in the same direction as the new flooring will go. Start from one end of the room and unroll the underlayment towards the other end.
Remember, the underlayment should cover the entire floor surface.
Trim Excess Material:
Use your utility knife to trim any excess underlayment along the walls.
Secure the Underlayment:
Use a staple gun or underlayment nails to secure the underlayment to the subfloor. Make sure to place the staples or nails approximately every 12 inches to ensure the underlayment is securely attached.
Seam Tape:
If your underlayment does not have a built-in seam tape, you will need to apply one. The seam tape will cover the joints and prevent any moisture from seeping through.
Repeat the Process:
Continue this process until the entire floor is covered with underlayment.
Installation of Desert Land Flooring
Step 1: Acclimate the Flooring
Start by placing the desert land flooring in the room where it will be installed for at least 48 hours. This allows the flooring to adjust to the room’s moisture and temperature conditions, preventing it from warping or shrinking after installation.
Step 2: Prepare the Floor
Ensure the subfloor is clean, dry, and level. Any dirt, debris, or uneven spots can affect how the desert land flooring fits and feels underfoot. Use a level to check for flatness and fill in any low spots with a self-leveling compound.
Step 3: Layout the First Row
Start installing the flooring at the longest uninterrupted wall. Lay out the first row of planks without securing them to see how they fit. You may need to cut the last plank to size. Remember to leave an expansion gap along all walls.
Step 4: Install the First Row
After adjusting the first row as necessary, begin the installation. Apply flooring adhesive to the subfloor and press the first row of planks into place. Use a tapping block and mallet to snugly fit the planks together.
Step 5: Continue Laying Planks
Continue installing the flooring, making sure each plank locks tightly with its neighbors. Stagger the end joints by at least 8 inches from one row to the next for a pleasing visual effect and added stability.
Step 6: Finish the Installation
After all the flooring is installed, remove the spacers and install baseboard molding or quarter-round to cover the expansion gap. Ensure the molding is nailed into the wall, not the flooring.
Related Topics:
Step 7: Tips and Tricks for a Smooth Installation
Acclimate Your Flooring:
Remember to acclimate the desert land flooring to the room’s conditions for a minimum of 48 hours before installation.
This step is crucial as it allows the flooring to adjust to the room’s humidity and temperature levels, which helps prevent warping or shrinking post-installation.
Check the Subfloor Carefully:
Don’t overlook the importance of a clean, dry, and level subfloor. Any dirt or irregularities can affect the fit and feeling of your new flooring. If necessary, use a self-leveling compound to even out any low spots.
Use Quality Installation Tools:
Using appropriate and high-quality installation tools not only simplifies the installation process but also ensures a secure and precise fit between the planks.
Stagger the Joints:
To achieve a visually pleasing effect and ensure stability, stagger the end joints by at least 8 inches from one row to the next.
Carefully Cut the Planks:
When cutting the planks to size, measure twice and cut once. It’s crucial to ensure that the cut plank fits perfectly, especially in the last row or around irregularly shaped areas.
Don’t Fasten the Molding to the Flooring:
When installing the molding, make sure to nail it into the wall and not the flooring. This allows the flooring to expand and contract freely, preventing any warping or buckling.
Post-Installation Steps
Cleaning and Maintenance After Installation
After the installation of desert land flooring, it’s essential to keep it clean and well-maintained to ensure its longevity. Start by sweeping or vacuuming to remove any dust or debris.
Avoid using a wet mop as excess moisture could harm the flooring. Instead, use a damp cloth for spot cleaning. For deeper cleaning, use specially formulated cleaners designed for desert land flooring.
Avoid using harsh chemicals or abrasive tools which can scratch or dull the floor surface. Regular cleaning preserves the floor’s appearance and prevents the accumulation of dirt and grime.
Inspection for Installation Defects
Post-installation, a thorough inspection is necessary to identify any potential installation defects. Start by visually scanning the floor for any noticeable issues such as gaps between planks, uneven surfaces, or protruding nails.
Use a level to check the flatness of the floor and ensure there are no low or high spots. Walk across the floor to feel for any loose planks or abnormal movement.
If you find any issues, it’s crucial to address them immediately. Call in a professional if necessary, to ensure the longevity and quality of your new desert land flooring.
Conclusion
In conclusion, the installation process of desert land flooring is meticulous but straightforward. It involves securing the molding to the wall, not the floor, to allow room for expansion and contraction.
After installation, the care and maintenance of your desert land flooring are paramount to ensure its longevity. This involves regular cleaning, ideally with sweeping or vacuuming, and spot cleaning with a damp cloth.
Special cleaners designed specifically for desert land flooring can be utilized for deeper cleaning. Avoid the use of harsh chemicals or abrasive tools.
A thorough and routine inspection for installation defects, such as gaps between planks or uneven surfaces, is also recommended to maintain the quality and durability of your flooring.
In case of any issues, don’t hesitate to consult a professional.
FAQs
What type of underlayment is suitable for desert land flooring?
It’s advisable to use a high-quality underlayment when installing desert land flooring. The underlayment serves as a moisture barrier and provides sound insulation. Depending on your specific needs, options like foam, cork, or rubber underlayment can be considered.
Can desert land flooring be installed over existing tile or wooden flooring?
Yes, desert land flooring can be installed over the existing tile or wooden flooring, provided the surface is flat, clean, and free from any structural defects. However, it is always recommended to consult with a professional before proceeding.