

Laying floor tiles on concrete is a great way to give your space a fresh, new look. It can enhance the overall aesthetic of any room and is relatively easy to do. However, before you start this project, it’s important to understand the process and have all the necessary tools and materials ready.
Properly laying floor tiles on concrete is crucial for several reasons. Firstly, it ensures that the tiles are securely attached to the surface and won’t become loose or crack over time. This not only affects the appearance of your space but also poses a safety hazard.
Additionally, proper installation can prevent water damage and mold growth, as well as improve insulation and energy efficiency.
Materials Needed
- Floor tiles of your choice
- Concrete primer
- Thin-set mortar
- Trowel
- Tile spacers
- Tape measure
- Level
- Chalk line
- Wet saw (for cutting tiles)
Preparation
Cleaning and Drying the Concrete Floor

Before you can begin the process of laying tiles, the concrete foundation must be thoroughly cleaned and dried. Start by sweeping the entire area to remove dust and loose debris using a broom. For any tough stains or residue, scrubbing the surface with a mixture of warm water and a mild detergent may be necessary.
Once you’ve ensured that the floor is clean, it’s important to let it dry completely. Any moisture left on the concrete foundation can interfere with the adhesion of the tiles, potentially resulting in loose or cracked tiles over time.
If the floor has been recently poured, it may take up to a month for the moisture to evaporate entirely. Using a dehumidifier or heater can help speed up the drying process.
Checking the Level of the Floor
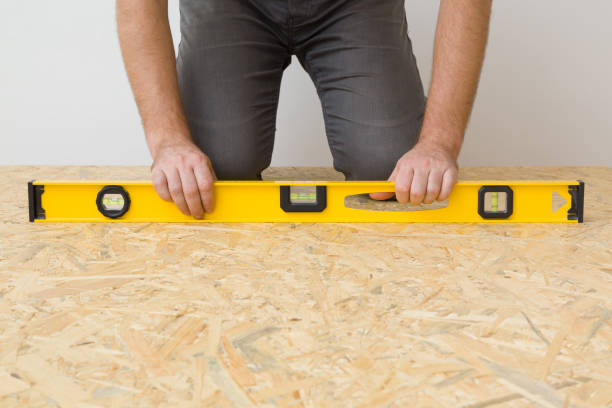
A crucial step before laying floor tiles on concrete is checking the level of the floor. A level floor is essential to ensuring that your tiles lay flat and that there are no uneven surfaces once the tiles are installed.
Start by sweeping a long level or straight edge across the surface of the floor. Observe closely if there are any gaps between the level and the floor. These gaps signal low spots, which may need to be filled in order to create a completely flat surface.
Conversely, if the level or straight edge rocks back and forth, you’ve discovered a high spot that may need to be sanded down.
In situations where the floor is significantly uneven, it may be necessary to apply a self-leveling compound. This product is mixed with water and poured onto the concrete surface, where it will flow into the low spots, creating a level floor.
Sketching a layout plan
Creating a layout plan for your floor tiles is important to ensure that you have enough tiles and that the design is visually appealing. A good first step is measuring the length and width of the room, as well as any nooks or corners. This will help you determine how many tiles you will need.
Next, sketch out your desired tile placement. You can experiment with different patterns and layouts to find the one that best fits your space. Take into consideration any obstacles such as doorways or cabinets, and make sure the layout is symmetrical if desired.
Setting up the Layout
Once you have your layout plan, it’s time to transfer it onto the concrete floor. Using a chalk line or straight edge and a pencil, mark out guidelines on the floor according to your layout plan. These guidelines will serve as a reference point when laying down the tiles.
Before you begin applying adhesive, it’s a good idea to lay out the tiles on the floor without any adhesive to make sure they fit properly and are in the desired location. This also allows you to make any necessary adjustments before permanently adhering to the tiles.
To lay out the tiles, start at one corner of the room and work your way outwards. Use spacers to ensure even spacing between the tiles. Make any necessary cuts using a tile cutter or wet saw.
Installing the Tiles
1. Mixing and Spreading the Adhesive
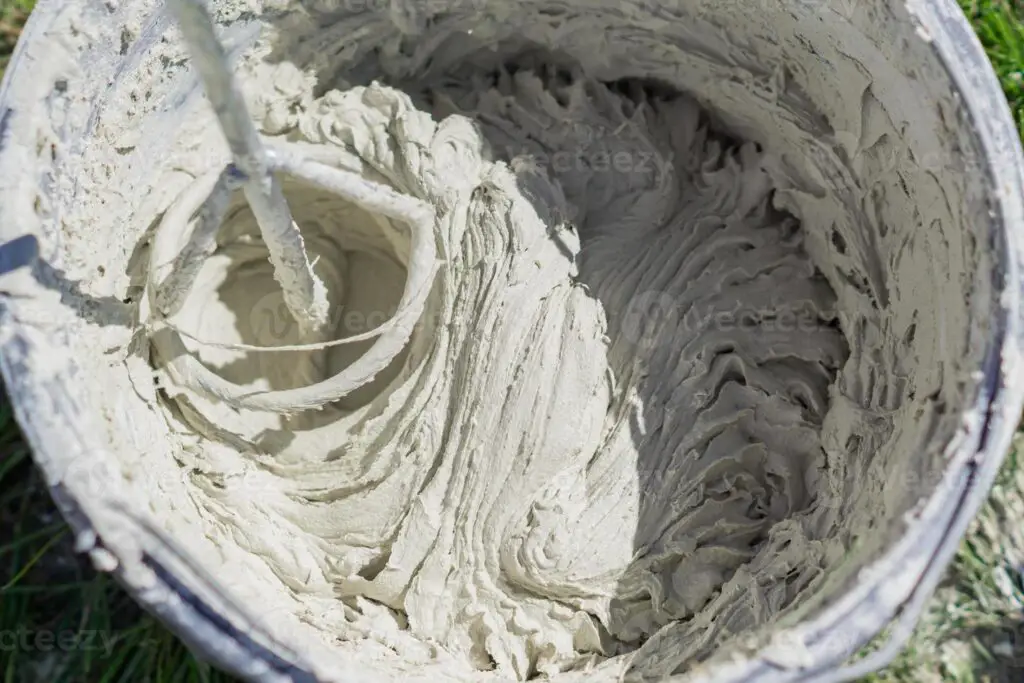
Image Source: Vecteezy
When the layout is ready, the next step is to mix and spread the adhesive. Start with a good quality thin-set mortar specifically designed for concrete floors and tiles. Following the manufacturer’s instructions, mix the thin set in a clean bucket until it reaches a peanut butter-like consistency.
To spread the adhesive, use a notched trowel to apply a thin layer to the concrete, starting with the guidelines drawn out from your layout plan. The size of the notches on your trowel should be appropriate for the size of the tiles – generally, larger tiles require a trowel with larger notches. Apply the adhesive in small sections to prevent it from drying out before the tiles are applied.
Ensure to spread the adhesive evenly, holding the trowel at a 45-degree angle to the floor. The notches in the trowel will create ridges in the adhesive, which will help the tiles adhere more firmly.
2. Laying out tiles according to the guidelines
After spreading the adhesive, begin laying down the tiles according to your layout guidelines. Press them firmly into the adhesive, using a slight twisting motion to ensure they are fully adhered. Use spacers between each tile to maintain even spacing.
Continue laying tiles in small sections until you have covered the entire floor. Check periodically that the tiles are level and use a rubber mallet to gently tap down any tiles that may be slightly raised.
If you need to make any cuts, use a tile cutter or wet saw according to the manufacturer’s instructions. These tools will help you make precise cuts needed for tiles at the edges and corners of the room.
3. Using tile spacers to ensure consistent gaps
Once all the tiles are laid, remove the spacers and fill in the gaps with grout. Grout comes in a variety of colors and can be purchased pre-mixed or as a powder to be mixed with water. Use a rubber float to evenly spread the grout over the tiles and into the gaps.
4. Cutting Tiles to Fit at Edges and Corners
To ensure a professional finish, you’ll often need to cut tiles to fit the edges and corners of the room. Measure the space at the edge or corner, and mark the size on the tile with a pencil or marker, allowing for the grout gap. For straight cuts, a manual tile cutter is highly effective.
Secure the tile in the cutter and score along the marked line using the tool’s wheel. Apply pressure to snap the tile along the scored line.
For more intricate cuts, such as around door frames or fixtures, a wet saw is essential. This tool uses water to cool the blade as it cuts, allowing for more precise and clean cuts.
Always remember to wear safety glasses to protect your eyes from any tile fragments. After cutting, gently sand the edges of the cut tile to remove any sharp areas. By properly cutting your tiles, the edges and corners of your floor will give off a polished, seamless finish.
Grouting the Tiles
Preparing the grout mix
Before applying the grout, make sure to follow the instructions on the packaging and mix it accordingly. It is important to use the correct ratio of water to powder for a strong and durable grout mixture.
Applying the grout
Using a rubber float, scoop some of the grout mixture and spread it over the tiles at a 45-degree angle, pressing it into the gaps between the tiles. Work in small sections at a time to prevent the grout from drying too quickly. Once the section is covered, use a damp sponge to wipe away any excess grout on the tiles before it dries.
Wiping off excess grout
After applying the grout, you may notice a haze on top of the tiles. This is caused by excess grout and can be easily removed with a clean, damp sponge. Wipe in circular motions to avoid pulling out any grout from between the tiles.
Finishing up
Allowing the floor to dry
After grouting, it is important to allow the floor to dry completely before walking on it. This can take anywhere from 24-48 hours, depending on factors such as humidity and temperature.
Cleaning the tiles
Once the grout is dry, use a tile cleaner and a damp mop to clean any remaining residue from the tiles. It is important to remove all grout haze and clean the surface before sealing.
Sealing the tiles
To protect your newly laid floor, it is recommended to seal the tiles with a penetrating sealer. This will help prevent staining and make future maintenance easier. Follow the instructions on the sealer for application and drying times.
Related Topics:
Maintenance Tips for Your New Tiled Floor
Taking proper care of your tiled floor ensures longevity and maintains its pristine look. Here are some maintenance tips:
Regular Cleaning: Sweeping or vacuuming your floor daily will prevent the accumulation of dust and debris that can scratch the surface of your tiles.
Mop Regularly: Use a damp mop with a mild detergent to clean your tiles. Avoid using harsh or abrasive cleaners, as they can damage the tiles and grout.
Grout Maintenance: Over time, the grout may discolor or become stained. Specialty grout cleaners can restore its appearance. Avoid using bleach or other harsh chemicals, which may damage the grout.
Prompt Spill Clean-up: To prevent stains, it’s crucial to clean up spills promptly, especially on grouted areas.
Use Protective Pads: Place felt pads under heavy furniture to prevent scratching the tiles. Avoid dragging furniture across the tile floor.
Seal Regularly: Even if your tiles were sealed after installation, it’s essential to reseal them every 1-2 years or as needed, depending on wear and tear, to ensure continued protection.
Conclusion
Laying floor tiles on concrete is a project that requires precision and patience, but with the right tools and techniques, the results can be stunning. From the initial floor preparation to the final sealing process, each step is crucial in achieving a beautiful and durable tiled floor.
Moreover, with the correct maintenance practices, your floor can retain its charm for years to come. Remember, regular cleaning, prompt spill clean-up, and periodic resealing are quintessential to preserve the aesthetics and durability of your tiled floor.
With these steps, you can enjoy a flooring solution that is both practical and visually appealing.
FAQs
Can tiles be laid directly on concrete?
Yes, tiles can be installed directly on concrete, as long as the surface is clean, level, and dry.
What type of tile adhesive should I use for concrete?
A modified thin-set mortar is recommended for laying tiles on concrete surfaces.
Do I need to seal my tiled floor?
It’s recommended to seal your tiled floor to protect it from moisture and stains.
3 thoughts on “How To Lay Floor Tiles On Concrete: A Complete Guide”