
Installing ceramic tile flooring on concrete is a relatively simple task that can be accomplished by most DIYers. With the right tools and materials, you can easily complete this project in one weekend. Here, we’ll walk you through the necessary steps to properly install ceramic tile flooring on concrete.
Materials and Tools Required
Before you begin installing your ceramic tiles, make sure you have all the necessary materials and tools on hand. Here’s a list of what you’ll need:
- Ceramic tile(s)
- Notched trowel
- Tile adhesive
- Level
- Pencil/marker
- Hammer
- Putty knife
- Tile spacers
- Grout
- Grout float
- Sponge
Preparing the Concrete Surface
Inspection for Cracks and Other Imperfections
Before the installation of your ceramic tiles can begin, it is crucial to inspect the concrete surface for any cracks or imperfections. These might interfere with the installation and longevity of your tiles. Use a level to ensure that the ground is flat.
If you discover any cracks, they should be filled using a concrete filler and smoothed out with a putty knife. Remember, a level and stable surface is paramount for a successful tile installation.
Larger imperfections may require the application of a self-leveling compound. Once these steps are complete, thoroughly clean the surface of any dust or debris.
Surface Cleaning and Leveling

After addressing any cracks or imperfections, the next step involves cleaning and leveling the surface. Thorough cleaning is essential to ensure the adhesive bonds properly with the concrete.
Use a high-quality broom or a vacuum cleaner to remove any dust, dirt, or loose particles from the surface.
Once the surface is clean, check for levelness using a long spirit level or a laser level. If the surface is not level, you will need to apply a self-leveling compound. Following the manufacturer’s instructions, mix the compound and pour it onto the low areas of the floor.
Use a trowel to spread the compound and smooth it out. Allow the compound to dry thoroughly based on the recommended drying time before proceeding with the tile installation. Remember, a level and clean surface is key to a successful and durable tile installation.
Planning the Layout
Measuring and Marking the Area

Proper measurement and marking are essential steps in achieving a professional and aesthetically pleasing tile installation. Start by measuring the length and width of the room using a tape measure. Multiply these measurements to get the total square footage.
This will help you determine the number of tiles you’ll need.
For marking the area, it’s best to start from the center of the room. This approach ensures balanced and symmetrical tile placement, improving the overall appearance of your installation.
Use a chalk line to mark the center point of the room – the intersection of two lines drawn from each pair of opposite walls.
Next, lay out a row of loose tiles along the center lines in both directions, leaving spaces for grout lines. Consider the width of the grout lines in your layout.
Standard grout lines for floor tiles are 3/16 to 1/4 inch. Adjust your lines as needed to avoid having to cut very narrow tiles along the walls.
With your layout planned, it’s now time to proceed to the next step – installing the ceramic tiles.
Deciding the Layout Pattern
Choosing the right layout pattern is a significant part of the tile installation process, as it can significantly impact the look and feel of the space. There are several patterns to consider:
The Straight Lay pattern, where tiles are installed in a simple, straight line, is the most common and easiest to lay out. It works well for square or rectangular tiles and is a great choice for small spaces, as it doesn’t distract the eye.
The Diagonal Lay pattern, also known as a diamond pattern, is similar to the straight lay but with tiles set at a 45-degree angle. This can add a sense of drama and movement to your room.
The Running Bond or brick pattern involves offsetting each row of tiles by half the width of the tile. This is the standard pattern for subway tiles and is also a popular choice for ceramic floor tiles.
The Herringbone pattern, formed by laying tiles in a zigzag pattern, creates a distinctive and attractive look. It’s a bit more complex to lay out, but it can add a striking visual element to your floor.
Consider the size and shape of your tiles, the size of the room, and your personal style when choosing a layout pattern. Remember, some patterns may require more cutting and fitting, so factor that into your decision as well. Once you’ve decided on a pattern, you can proceed to the next step of the installation.
Applying the Thin-set Mortar
Mixing the Thin-set Mortar
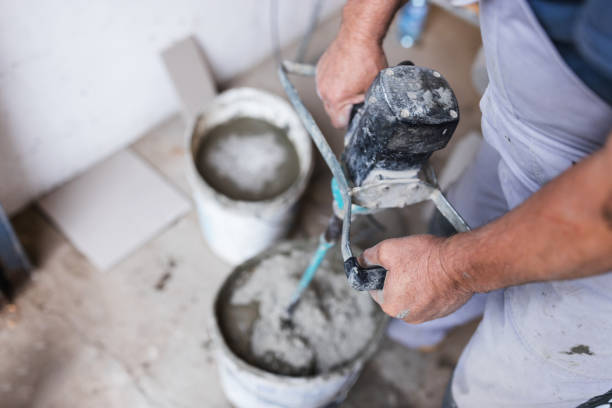
Before applying the thin-set mortar, it must first be properly mixed. Begin by pouring the appropriate amount of water into a clean bucket, as specified by the mortar manufacturer.
Next, gradually add the thin-set powder to the water, stirring as you go. It’s crucial to add the powder to the water, not the other way around, to ensure a smooth, lump-free mixture.
Use a drill with a mixing paddle attachment for optimal results. The ideal consistency of the mixture should be similar to peanut butter – not too runny, not too thick. Allow the mixture to sit, or ‘slake,’ for about 10-15 minutes to let the chemicals activate fully.
After slaking, give it one more quick stir before applying the mortar to the concrete floor. Always remember to mix only as much thin-set as you can use in about an hour; any longer, and the mixture could start to harden and become unusable.
Applying the Mortar on the Concrete Surface
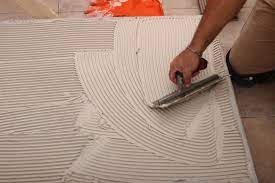
With your freshly mixed thin-set ready, it’s time to start applying it to the concrete floor. Begin by using a notched trowel – the size of the notch will depend on the size of your tile and the recommendations from the thin-set manufacturer.
Hold the trowel at a 45-degree angle and spread a layer of the thin-set onto a small section of the concrete surface.
Bear in mind that you should only cover as much area as you can set tiles on within a 10-15 minute period; otherwise, the thin-set could begin to dry before the tile is in place.
Once you have a layer of thin-set applied, “comb” the mortar with the notched side of your trowel, creating even parallel lines. This technique ensures an adequate bond and provides a level bed for your tiles.
Remember to periodically check your mortar for skinning (when the surface begins to dry). If the mortar is too dry, the tiles will not adhere correctly. If this happens, scrape off the dry thin-set and apply a fresh mix. Now, you’re ready to start setting your tiles.
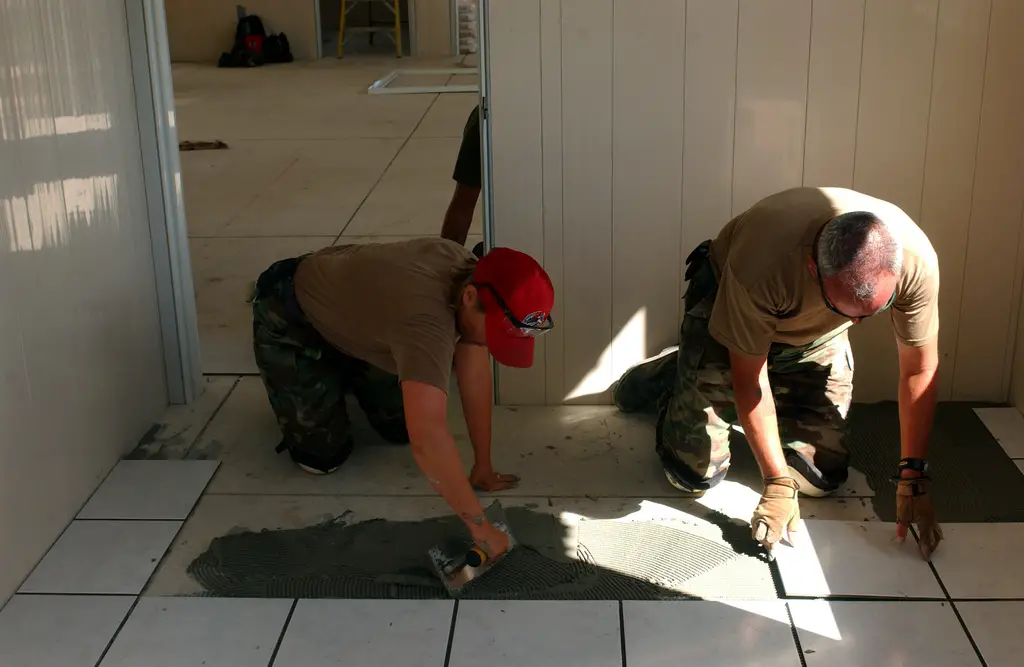
Laying the Ceramic Tiles
Begin tile placement by carefully pressing a tile into the thin-set mortar. Use a slight twisting motion to ensure the tile is fully bedded into the mortar. Always start from the center and move towards the periphery of the room, using your layout lines as a guide.
After placing the first tile, insert tile spacers at its corners to create a consistent gap for the grout.
Proceed to place more tiles, ensuring each tile is level with the others. An uneven tile surface can cause trip hazards and an unpleasant aesthetic. Also, keep checking your alignment with the layout lines as it’s easy to drift off course.
Periodically pull a tile up after placing it to check for full coverage of the thin set on the back of the tile. If more than 80-90% of the tile is not covered with the thin set, you may need to use a larger notched trowel or backbutter the tiles.
Continue this process, cleaning any thin set that oozes out from between the tiles immediately with a damp sponge to prevent it from hardening.
Once you’ve covered the area you’ve spread thin-set on, move on to the next section, and repeat the process.
Ensuring Tiles are Even and Aligned
Ensuring that your tiles are evenly placed and aligned is crucial for a professional-looking finish. To do this, use a level tool after setting each tile. Place the level on top of the tiles, adjusting each one until the bubble in the level tool is centered. This indicates that your tiles are level.
For alignment, continue to use your layout lines as a reference. As you progress, frequently step back and visually inspect the tiles from a distance. This will help you spot any alignment issues early on, so they can be corrected before the mortar dries.
Also, keep a close eye on the tile spacers. They should maintain a consistent distance between your tiles, ensuring an even grout line.
However, never assume that the spacers are doing all the work. Always double-check to make sure your tiles are parallel to each other and that the grout lines are straight.
Related Topics:
Cutting and Fitting Tiles
Techniques for cutting tiles
At some point, you’ll need to cut tiles for corners, edges, and other areas where a full tile won’t fit. There are several ways to do this. For small cuts, you can use a tile nipper. This tool has carbide jaws that allow you to break off chips of tile until the piece fits properly.
If you have larger cuts to make, you can use a wet saw. This is an electric tile saw with a diamond blade that allows you to cut tiles to the exact size you need. For intricate cuts in curved or odd-shaped areas, a manual or electric tile cutter may be your best bet.
Fitting tiles around obstacles
Lastly, when fitting tiles around obstacles such as pipes and electrical outlets, there are several options to consider. You can either cut the tile to fit around it or use a hole saw to create a space for it. If you decide to cut the tile, make sure you measure precisely and use appropriate cutting tools.
You can also purchase pre-cut pieces called “tile trims” to make the job easier. These pieces come in a wide variety of shapes and sizes, so you should be able to find one that fits your needs.
Mixing and Applying the Grout
Preparing the Grout
To prepare the grout for application, you will need to mix it according to the manufacturer’s instructions. This typically involves combining a grout powder with a specific amount of water.
It’s crucial to add the water slowly and mix thoroughly to prevent lumps from forming. The resultant mixture should have a smooth, paste-like consistency.
Applying the Grout
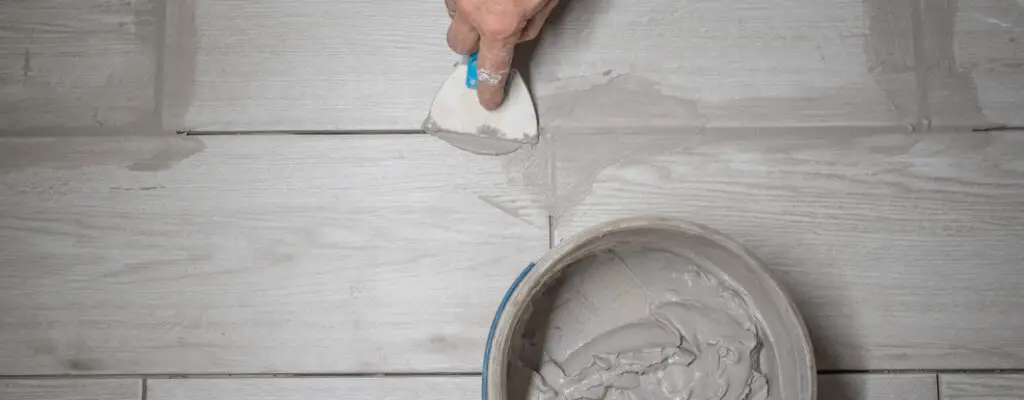
Once your grout is ready, use a grout float to spread it over the tiles. Hold the float at a 45-degree angle and apply the grout diagonally across the tiles to ensure it fills in all the joints evenly.
Be sure to keep a bucket of water and a sponge handy to wipe away any excess grout from the surface of the tiles.
After applying the grout, allow it to sit for about 10-15 minutes, or as per the manufacturer’s instructions, before wiping off the excess. Remember to rinse your sponge frequently during this process to avoid leaving a haze on your tiles.
Once the grout has fully cured (which may take up to a few days depending on the type of grout used), you can apply a grout sealer to protect it from stains and moisture.
Cleaning and Sealing
Cleaning excess grout
Once the grout has cured, it’s time to clean up. Use a damp sponge or cloth to wipe away any excess grout from the surface of the tiles, then use a mild detergent and warm water to give your tile floor a final scrub.
Sealing the grout and tiles
After the tile has been thoroughly cleaned, it’s time to seal it. This step is important as it will protect your tile from water damage and other stains. Once you’ve applied the sealer, be sure to give your floor plenty of time to dry before walking on it.
Related Topic: Vinyl vs Laminate Flooring Pros and Cons: Ultimate Guide
Final Thoughts
Finally, once your tile floor is installed and sealed, it’s important to maintain it properly. Be sure to sweep and mop regularly to prevent dirt and debris from building up on the surface of the tiles.
You should also use a grout sealer every one or two years to keep your grout looking fresh.
Installing a tile floor correctly takes some time and patience, but with the right tools and materials, you can complete this project in no time. With proper care and maintenance, your tile floor will look beautiful for years to come!
1 thought on “How To Install Ceramic Tile Flooring On Concrete | Step-by-Step Guide”