
Click flooring is a great way to get the look of hardwood without the cost or upkeep. But, what happens if a piece gets damaged or needs replacing? Don’t worry, we’ve got you covered!
In this blog post, we’ll give you an easy step-by-step guide on how to replace a piece of click flooring in your home. Let’s get started!
What is Click Flooring?
Click flooring is an innovative new type of floating floor system that makes installation easy and quick. Its design enables it to quickly and easily interlock into place, so no adhesive is needed for installation.
The panels are usually made from vinyl, laminate, hardwood, or engineered wood, and come in many different models such as plank or parquet shapes. It’s a great choice for DIYers who want to save time and money on the installation process.
An added bonus of click flooring is that it can usually be taken up relatively quickly if you decide to replace it in the future.
Whether you’re looking for a durable replacement floor in a hectic household, or something more fashionable for a living room or bedroom, click flooring offers a great solution!
1. Materials Required
- Click flooring
- Underlayment
- Tape measure
- Utility knife
- Chalk line
- T-bar installation tool
2. Preparing the Area
The first step to successfully replacing a piece of click flooring is to prepare the area. Before you begin, make sure that all furniture and rugs have been moved from the area so that you have unrestricted access to the damaged piece.
Also, make sure to clean any dirt or debris that may be present in order to ensure that your new piece will fit properly.
3. Removing the Damaged Piece
Now it’s time to remove the damaged piece of click flooring. Start by using a utility knife to cut off any excess pieces around the damaged area then use a putty knife or flathead screwdriver to pry up one corner of the damaged board.
Once it has been lifted slightly, use your fingers or pliers to pull up and remove it from its slot in the interlocking system.
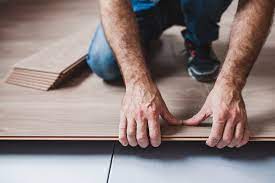
4. Installing The New Piece
Once you have removed the old board, you can now start installing your new one! Start by lining up one side with an adjacent board and press down firmly until it fits into place within its slot in the interlocking system.
Then use a rubber mallet to tap down any edges that may not fit properly until they are securely fitted into their slots.
Lastly, use a damp cloth with mild soap and water over your new board in order for it to blend in evenly with its surroundings before moving any furniture back into place.
Related Topic: How To Cut Laminate Flooring With Padding Attached? Safely!
Can click Flooring Be Repaired?
Click flooring offers a cost-effective way for homeowners to enjoy the look of luxury without breaking the bank. Unfortunately, click flooring can eventually succumb to wear and tear over time.
The good news is that click flooring usually has an easy repair process that can be done by amateur DIYers in their own homes, avoiding the extra expense of hiring a contractor. While it may require some elbow grease, it’s still much easier than completely replacing your damaged floor.
In many cases, using liquid fillers and finishing tools such as a router or belt sander will provide you with quick, satisfactory results no matter how deep or wide the damage.
By taking the initiative to repair minor damages, you won’t only boost your confidence but also prolong the life of your click flooring.
How To Repair Click Flooring?
Step 1: Assess the Damage
The first step in repairing click flooring is to assess the damage. If you notice any significant cracks or gaps that could affect the structural integrity of the planks, this may require professional assistance and should not be attempted without proper training.
However, if the damage is minor such as scratches or small tears you may be able to make a successful DIY repair at home.
Step 2: Remove Damaged Pieces
Once you’ve identified which pieces need to be replaced, you must remove them from the existing floor. Begin by prying up any loose edges of the damaged plank with a pry bar or flathead screwdriver.
Use caution during this step as too much force can cause additional damage. Once all edges are loosened, you should be able to remove the entire plank with ease.
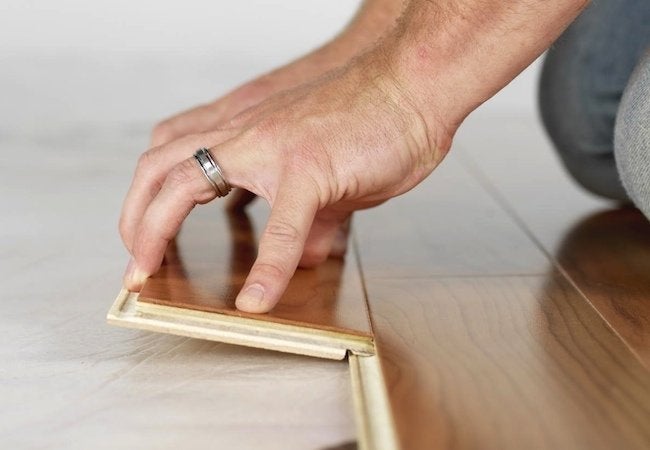
Step 3: Install New Planks
Now it’s time to install your new planks! Start by aligning them with your existing floor as closely as possible before clicking them into place using a rubber mallet or block of wood.
It’s important to ensure that everything is properly aligned before installing each piece otherwise, you could end up with an uneven finish on your restored floor!
Step 4: Clean Up
Once all new planks have been installed, clean up any remaining debris and take a look at your handiwork! You may find it helpful to run a vacuum over the newly repaired areas for extra assurance that no bits of dirt or dust were left behind during installation.
How to Keep Safe Click Flooring from Damage?
1. Regular Cleaning
The best way to keep your click flooring looking like new is to make sure it’s regularly cleaned. Follow the manufacturer’s instructions for cleaning the specific type of click floor you have installed in your home.
In general, sweeping or vacuuming is recommended using an attachment with soft bristles so that you don’t scratch the surface of the tiles.
You should also use mild detergent and warm water when mopping, making sure not to use too much liquid as this can cause damage to the seams between tiles or boards.
2. Furniture Pads
Another way to protect your click flooring from damage is by placing furniture pads under all heavy furniture items such as couches and dining tables. This will prevent scratches and dents caused by dragging furniture across the floor.
It is also important that any furniture items with wheels have locks on them so they do not move while placed on top of the click flooring.
3. Avoid Shoes Indoors
It might be tempting to wear shoes indoors so that you don’t have to take them off every time you enter and exit the house, but it’s better for your click floors if you avoid wearing shoes inside altogether.
Shoes can track dirt into the house which can accumulate on your click floors over time and cause discoloration or damage.
If this isn’t possible, at least remove shoes before walking onto any areas with click flooring installed as this will help reduce potential damage from occurring from shoe soles dragging against the tiles or boards.
Related Topic: How To Install Flooring On The Wall? 3 Safe Steps
Conclusion
Replacing a piece of click flooring doesn’t have to be difficult it just takes some patience and attention to detail! With our simple guide, we hope that we’ve provided homeowners like yourself with enough information on how they can replace their own click flooring when needed.
If you ever find yourself needing more help or advice on how best to replace your click flooring, don’t hesitate to contact us here at Metric Marketing for more guidance and support! Until then, happy replacing!
FAQs
Can you replace individual laminate planks?
Replacing individual laminate planks is totally achievable if you’ve got the right tools. You’ll need to replace all of the planks in a row rather than just one, as connecting new ones with old ones won’t be secure.
To do it properly, first, remove the baseboard, then disconnect all the planking before finally sliding in the new pieces and securing them into place. With some patience and a little know-how, you’ll have renewed laminate flooring in no time!
Can you buy single laminate flooring?
It is possible to buy single pieces of laminate flooring, either online or in physical stores. Single planks are great for repairs and installing additional layers on top of existing floors. You can also purchase floor edging, which provides a neat finish to the edge of the laminate.
Both options allow you to match new pieces exactly with existing flooring, restoring it back to its former glory!
Related Topic: How Can I Match My Flooring? 3 Simple Steps
How to repair laminate flooring water damage?
Sometimes laminate flooring can be damaged by water, however, this doesn’t necessarily mean you have to replace the entire floor. If you act quickly and follow the right steps, it’s possible to repair water damage on your laminate floors.
First, remove any standing water, then check for any warping or buckling. If necessary, replace the affected planks with new ones and let them sit overnight before sanding down the area and reapplying finishing coats of sealant.
1 thought on “How Do You Replace A Piece Of Click Flooring: Is It Possible?”