

Luxury Vinyl Plank (LVP) flooring has become one of the most popular flooring choices in the US and for good reason. It’s durable, waterproof, affordable, and looks remarkably like real hardwood. But despite its reputation for being low-maintenance, LVP is frequently damaged by well-meaning homeowners using the wrong cleaning products and methods.
Steam mops, ammonia-based cleaners, abrasive scrubbers, and even some popular ‘floor cleaners’ sold at US home improvement stores can permanently damage the protective wear layer on your LVP floor and in many cases, void your manufacturer warranty in the process.
This guide covers everything you need to know to clean, maintain, and protect your LVP flooring correctly.
Why Cleaning LVP Correctly Matters?
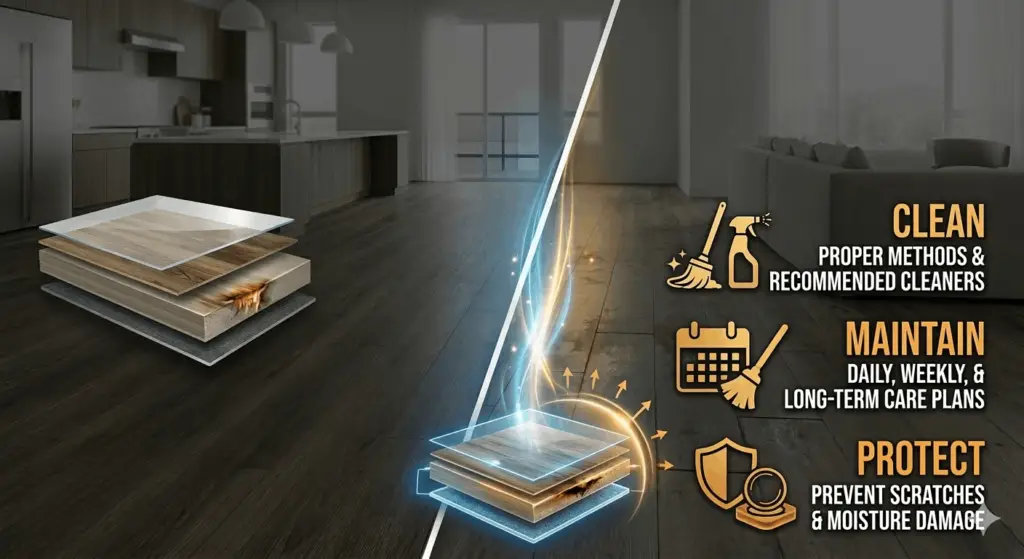
Most cleaning guides skip this critical section but understanding how LVP is constructed explains exactly why certain products and tools damage it. LVP flooring is made up of four distinct layers, each with a specific function:
- Wear Layer (top): A clear, protective coating made from aluminum oxide or urethane. This is what gives LVP its scratch and stain resistance. It ranges from 6 mil (basic) to 20+ mil (commercial-grade). This is the layer most commonly damaged by wrong cleaning products.
- Decorative Layer: A photographic image layer printed to look like wood, stone, or tile. This layer sits beneath the wear layer and gives LVP its realistic appearance.
- Core Layer: The structural center either WPC (Wood Plastic Composite) or SPC (Stone Plastic Composite). SPC cores are denser and more dimensionally stable. This layer can be damaged by excessive heat or prolonged moisture exposure.
- Underlayment/Backing Layer: The bottom layer that provides cushioning, sound absorption, and additional moisture resistance.
When you use harsh chemicals like bleach or ammonia, you degrade the wear layer stripping away the very coating that makes LVP scratch and stain resistant. Once the wear layer is compromised, it cannot be restored without replacing the planks.
Similarly, steam mops force heat and moisture into the seams between planks, potentially delaminating the layers or weakening the adhesive in glue-down installations.
What You Need to Clean LVP Flooring
Before getting into the step-by-step process, here are the tools and products you should have on hand:
Recommended Tools
- Soft-bristle broom or dust mop: For daily dry sweeping your most important maintenance tool
- Microfiber mop (flat head): The best mop type for LVP holds just enough moisture without soaking the floor
- Vacuum with hard floor setting: Must have the beater bar disabled beater bars scratch and scuff the wear layer
- Microfiber cloths: For spot cleaning stains and spills
- Spray bottle: For diluting cleaning solutions and applying to spot areas
- Soft-bristle nylon brush: For scrubbing stubborn stains never use steel wool or abrasive pads
Recommended Cleaning Products for LVP Floors
Not all floor cleaners are LVP-safe. Here are the best options available at US retailers:
- Bona Hard-Floor Cleaner: pH-neutral, no-rinse formula specifically designed for hard floors including LVP. Widely available at Target, Home Depot, and Amazon. Recommended by multiple LVP manufacturers including LifeProof and COREtec.
- Zep Neutral pH Floor Cleaner: A professional-grade cleaner available at Lowe’s and Home Depot. Dilutes well and leaves no residue excellent for routine mopping.
- Black Diamond Stoneworks Wood & Laminate Floor Cleaner: Safe for LVP, laminate, and hardwood. Streak-free formula makes it a popular choice for homeowners with multiple flooring types.
- Homemade solution (1 cup white vinegar + 1 gallon warm water): An effective and affordable option for regular maintenance. Note: use sparingly frequent use of vinegar can gradually dull high-gloss finishes over time due to its mild acidity.
- Plain warm water: For light cleaning between deeper cleans often sufficient for removing light dust and footprints when used with a well-wrung microfiber mop.
How to Clean LVP Flooring: Step-by-Step
Step 1: Dry Clean First (Every Time)

Before any wet cleaning, always remove loose dirt, dust, and debris first. Skipping this step is one of the most common mistakes US homeowners make dragging a wet mop over gritty debris acts like sandpaper on the wear layer, creating microscopic scratches that accumulate over time and dull the floor’s finish.
Use a soft-bristle broom, dust mop, or vacuum on the bare floor / hard surface setting (beater bar OFF) to clear the floor completely.
Pay special attention to corners, edges along walls, and the gaps between planks where dirt and pet hair tend to accumulate.
Step 2: Prepare Your Cleaning Solution
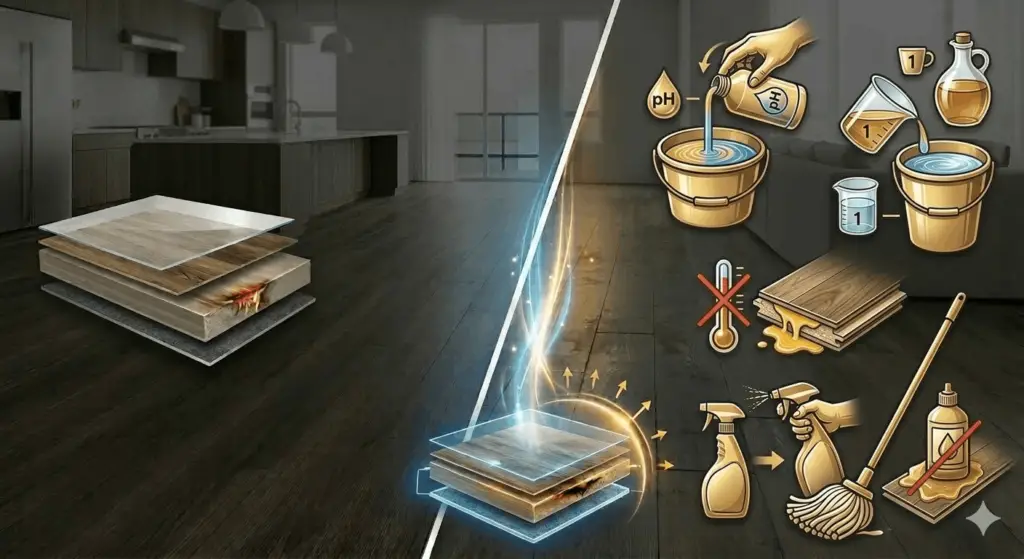
For routine mopping, mix your chosen pH-neutral cleaner with warm water according to the product’s dilution instructions. If using the vinegar solution, mix 1 cup of white vinegar with 1 gallon of warm water.
Avoid hot water while it seems more hygienic, very hot water can soften the adhesive on glue-down LVP installations over time.
Never apply cleaning solution directly to the floor from the bottle. Always dilute properly and apply via a well-wrung mop or spray bottle.
Concentrated cleaners can leave a residue film that builds up with each cleaning and progressively dulls the floor’s finish.
Related Topics:
Step 3: Mop with a Damp (Not Wet) Microfiber Mop
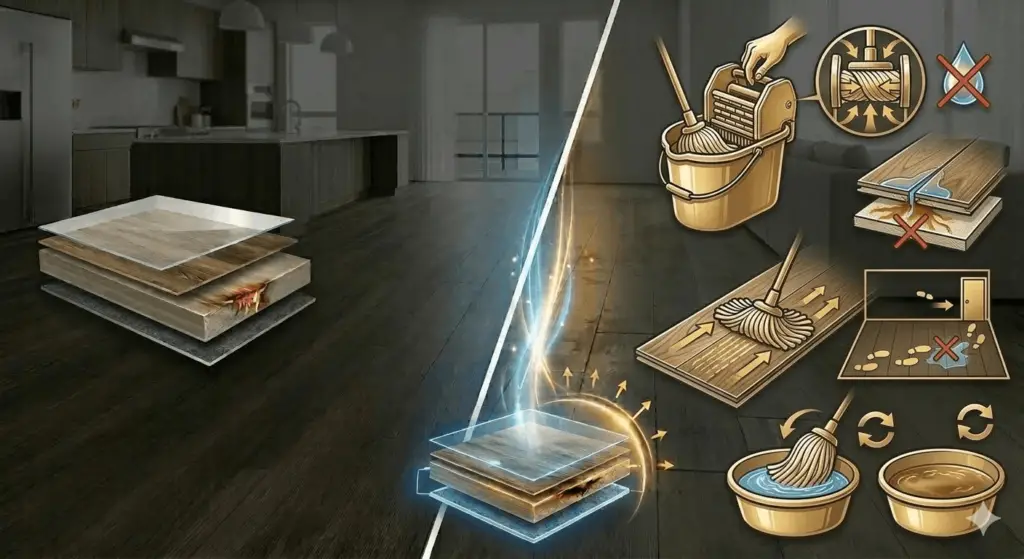
The most important rule for mopping LVP floors: your mop should be damp, not wet. Wring the mop thoroughly until no water drips from it when held up.
Excess water on LVP floors can seep into the seams between planks and reach the subfloor underneath even though the planks themselves are waterproof, the seams are not perfectly sealed in most floating installations.
Mop in the direction of the plank grain using smooth, overlapping strokes. Work from the far end of the room toward the door so you don’t step on freshly cleaned areas.
Rinse the mop head frequently every few passes to avoid spreading dirty water back over a clean floor.
Step 4: Dry the Floor
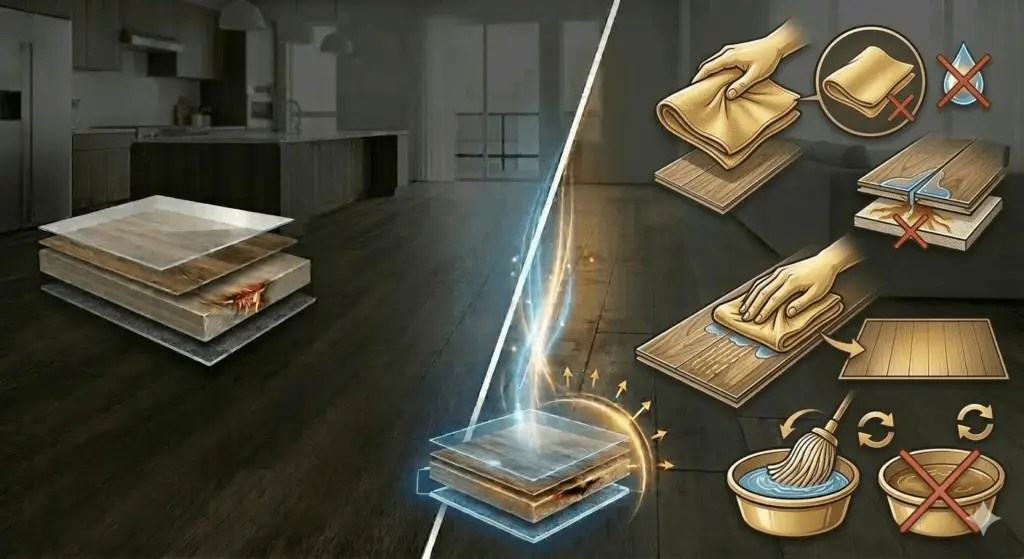
In normal conditions, a properly wrung microfiber mop will leave the floor almost immediately dry. However, if you notice any areas that remain visibly wet after mopping, wipe them with a dry microfiber cloth. Never leave standing water on LVP floors, even briefly.
Room-by-Room Cleaning Frequency Guide
How often you clean your LVP floors should depend on foot traffic, pets, and room use. Here’s a practical guide for US households:
| Room | Sweep/Vacuum | Damp Mop | Deep Clean |
| Kitchen | Daily | 2–3x per week | Monthly |
| Bathroom | Every other day | Weekly | Monthly |
| Living Room | 2–3x per week | Weekly | Every 2–3 months |
| Bedroom | Weekly | Every 2 weeks | Every 3–6 months |
| Entryway/Mudroom | Daily | 2–3x per week | Monthly |
| Basement | Weekly | Every 2 weeks | Every 3 months |
| Pet household (any room) | Daily | Every other day | Monthly |
Complete Stain Removal Guide for LVP Flooring
This is the section almost every competing article skips entirely yet it’s one of the most searched topics by US homeowners. Here’s how to tackle the most common stains on LVP floors safely:
Pet Urine and Accidents
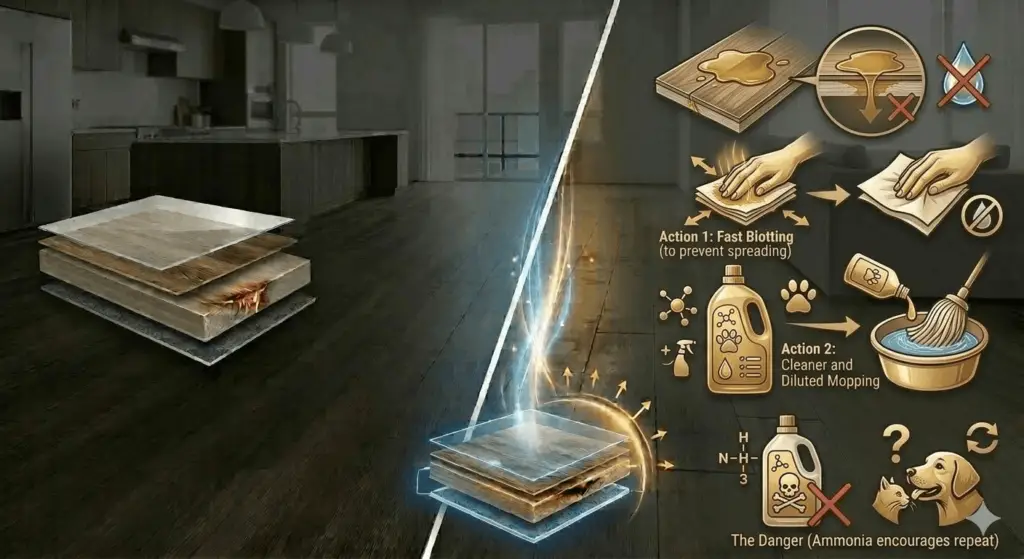
Act fast the longer pet urine sits, the more it can penetrate the seams and reach the subfloor. Blot up as much liquid as possible with paper towels or a dry microfiber cloth. Do not rub blotting prevents the liquid from spreading.
Then clean the area with a pet-safe enzyme cleaner like Nature’s Miracle or Rocco & Roxie. These enzyme-based formulas break down the uric acid crystals that cause lingering odor. Dilute as directed and mop the area, then dry thoroughly.
Avoid ammonia-based cleaners for pet accidents the smell resembles urine to pets and may encourage repeat accidents in the same spot.
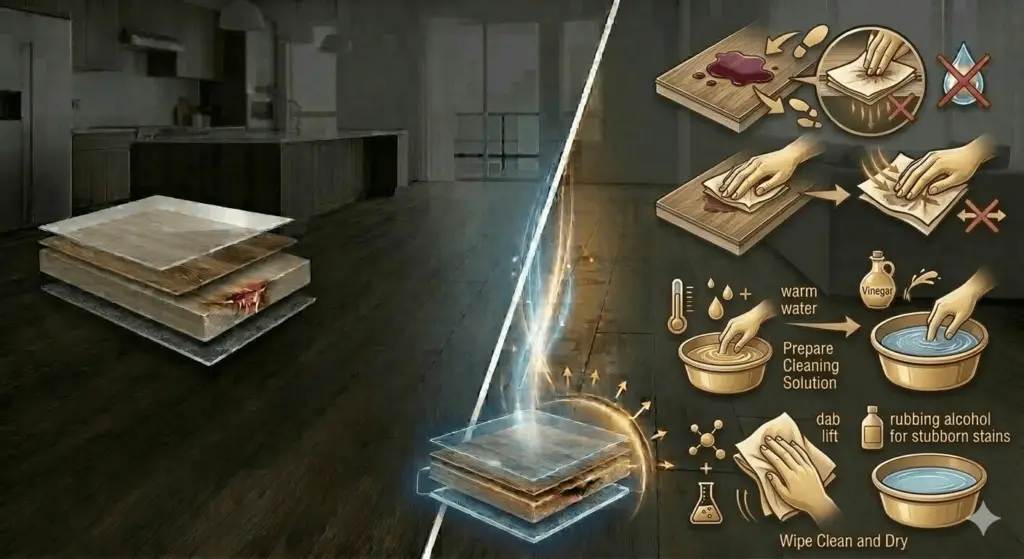
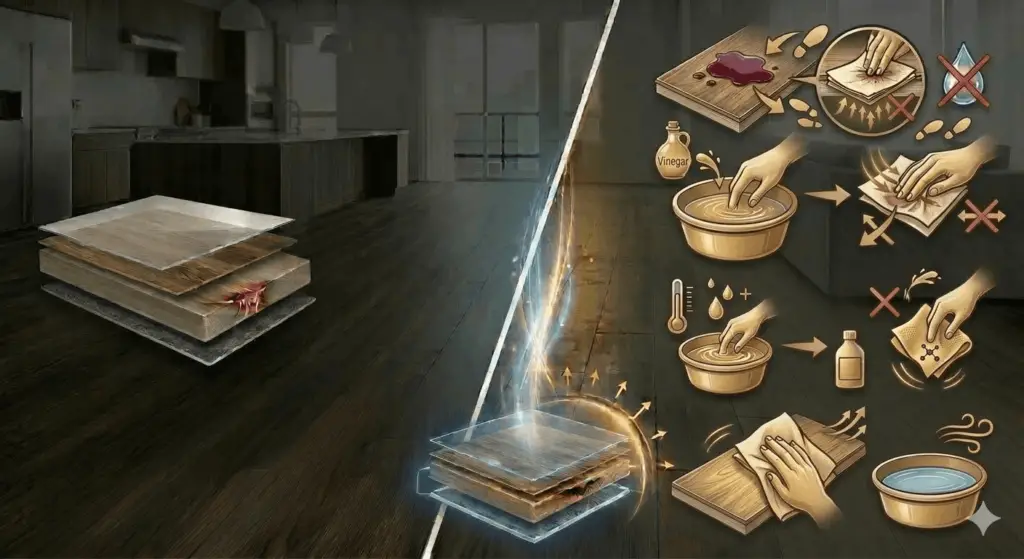
Red Wine and Dark Beverages
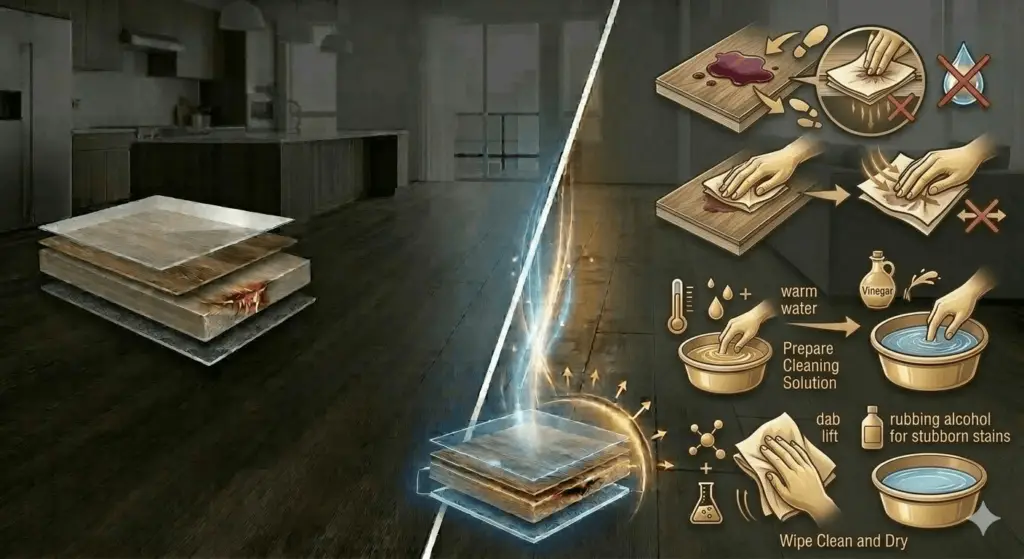
Blot immediately with a clean white cloth to absorb as much liquid as possible. Mix a solution of warm water, a few drops of dish soap, and a splash of white vinegar.
Apply with a cloth and work from the outside of the stain inward to prevent spreading. For stubborn staining, a small amount of isopropyl (rubbing) alcohol on a microfiber cloth can be effective. Wipe clean with plain water afterward and dry.
Grease and Cooking Oil
Apply a small amount of dish soap directly to a damp microfiber cloth and rub gently over the grease spot. Dish soap is specifically formulated to cut through oil and grease and is safe for LVP wear layers when used sparingly and rinsed away thoroughly.
Follow with a clean damp cloth to remove all soap residue, then dry.
Related Topics:
Ink and Marker
Isopropyl rubbing alcohol (70% concentration) is highly effective on ink stains. Apply a small amount to a clean white cloth and dab don’t rub the stain.
The alcohol dissolves the ink without damaging the wear layer. Always test in an inconspicuous area first. Clean with plain water afterward.
Nail Polish
Do not use nail polish remover (acetone) on LVP it will dissolve the wear layer. Instead, use a small amount of isopropyl alcohol or a melamine foam eraser (Magic Eraser used very gently).
If the polish has hardened, use the edge of a plastic credit card to gently lift the bulk of it before treating the residue.
Scuff Marks
Rubber scuff marks from shoes or furniture are common on LVP and look worse than they are. In most cases, a damp microfiber cloth rubbed in a circular motion will remove them.
For stubborn scuffs, apply a small amount of WD-40 to a cloth and rub gently this loosens rubber scuffs without harming the wear layer.
Wipe away any WD-40 residue with a clean damp cloth immediately after.
Wax or Gum
Place a bag of ice over the wax or gum for several minutes to harden it. Once hardened, use a plastic scraper or old credit card to gently lift the bulk of it off the surface.
Remove any remaining residue with a small amount of mineral spirits on a cloth. Clean the area with warm water afterward. Never use a metal scraper it will gouge the wear layer permanently.
Baking Soda / Dried Food
Allow dried food residue to soften with a damp cloth for a few minutes before attempting to remove it. Then gently scrape with a plastic scraper and clean with warm water and a few drops of dish soap.
For caked-on debris, a paste of baking soda and water applied with a soft brush can help break it down without scratching.
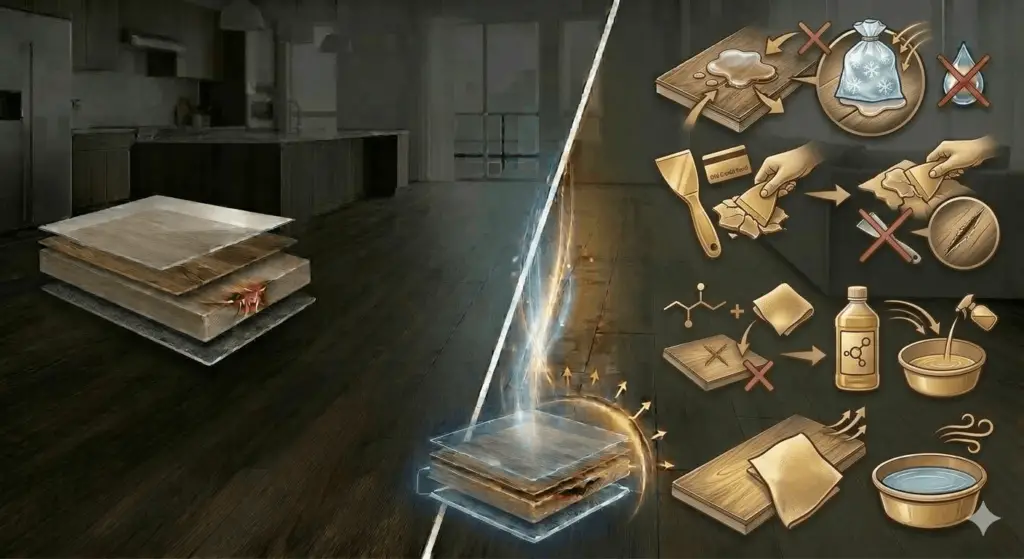
Products and Tools You Should NEVER Use on LVP Flooring
This list is critical many common household products that are safe on other floor types will permanently damage LVP. These are the most important ones to avoid:
- Steam mops: The heat and concentrated moisture can warp planks, delaminate layers, and weaken adhesive in glue-down installations. Many LVP manufacturers explicitly state that steam mop use voids the warranty.
- Ammonia or ammonia-based cleaners: Breaks down the chemical bonds in the wear layer, causing cloudiness, cracking, and loss of sheen over time. Common household cleaners like Windex contain ammonia keep them away from LVP.
- Bleach (undiluted): Extremely harsh on the wear layer. While heavily diluted bleach is sometimes used for disinfecting, even diluted bleach should only be used as a last resort and rinsed thoroughly.
- Wax-based polishes and floor waxes: LVP doesn’t need waxing and cannot benefit from it. Wax-based products build up on the surface, creating a dull, sticky film that attracts more dirt and is difficult to remove.
- Oil-based soaps (like Murphy Oil Soap): Designed for hardwood, not vinyl. Oil soaps leave a residue film on LVP that progressively dulls the finish and can make floors slippery.
- Abrasive scrubbers and steel wool: Any abrasive pad will scratch the wear layer even pads marketed as ‘gentle.’ Always use microfiber cloths or soft-bristle nylon brushes only.
- Soaking the floor with water: Even though LVP planks are waterproof, the seams between planks in floating installations are not sealed. Excessive water can reach and damage the subfloor beneath.
- Vacuum beater bars: The rotating brush in standard vacuum beater bars creates micro-abrasions on the wear layer. Always disable the beater bar or use a vacuum with a dedicated hard-floor mode.
- Rubber-backed mats (non-staining only): Some rubber backings contain chemicals that can stain or discolor LVP over time. Use only mats with non-staining, breathable backing.
Related Topics:
LVP Cleaning Tips for Pet Owners
Pets are one of the main reasons US homeowners choose LVP its waterproof wear layer handles accidents far better than hardwood or laminate. But pet ownership does require some additional cleaning considerations:
- Daily sweeping is non-negotiable: Pet hair and dander accumulate quickly and act as abrasive grit underfoot. In homes with shedding pets, daily sweeping or vacuuming (beater bar off) is the single most important maintenance habit.
- Clip pet nails regularly: Long nails especially on larger dogs are one of the top causes of wear layer scratches on LVP. Even thick wear layers (12–20 mil) can be scratched by unclipped nails dragged across the surface during playing or running.
- Use enzyme cleaners for accidents: Standard floor cleaners don’t fully eliminate pet odor at the molecular level. Enzyme-based cleaners like Nature’s Miracle or Angry Orange are specifically formulated to break down uric acid and eliminate odor permanently rather than just masking it.
- Place washable runners in high-traffic pet areas: Near food and water bowls, pet beds, and doorways. Waterproof, non-staining mats protect the floor and are far easier to clean than the floor itself.
- Check seams around water bowls: Dogs and cats frequently splash water from their bowls. If water sits in the seams near food areas for extended periods, it can eventually reach the subfloor. Place a waterproof mat under water bowls and check that the area is kept dry.
How to Repair Scratches on LVP Flooring
Because LVP cannot be sanded and refinished like hardwood, scratches require a different approach. The good news is that most surface scratches on LVP are repairable without plank replacement:
Light Surface Scratches
Very light scratches on the wear layer can often be minimized with a LVP floor repair crayon or touch-up pen in a matching color. These products, available at Home Depot and Amazon, fill in the scratch with colored wax and blend it into the surrounding floor.
Clean the area first, apply the crayon or pen, buff gently with a soft cloth, and the scratch becomes virtually invisible.
Moderate Scratches
Slightly deeper scratches that penetrate through the wear layer into the decorative layer can be addressed with vinyl floor repair paste or colored putty.
Apply the filler to the scratch, level it with a plastic putty knife, let it cure, then buff with a terry cloth. For the best color match, take a plank sample to a flooring store and use their scratch repair kit.
Deep Gouges or Severely Damaged Planks
If a plank is deeply gouged, cracked, or water-damaged, the most effective and long-term solution is plank replacement.
This is why flooring professionals always recommend purchasing 10–15% extra LVP planks when installing to have matching material for future repairs. In click-lock floating installations, planks can be disassembled from the nearest wall to the damaged plank and replaced without disturbing the rest of the floor.
Protecting Your LVP Warranty
This is one of the most important and most overlooked aspects of LVP maintenance. Most major US LVP manufacturers, including Shaw, Mohawk, LifeProof (Home Depot’s house brand), COREtec, and Armstrong, include specific cleaning requirements in their warranty terms.
Failing to follow them can void your warranty coverage for wear, staining, and manufacturing defects.
While requirements vary by brand, the following are near-universal across US manufacturer warranties:
- No steam mops: Explicitly prohibited by virtually all major LVP manufacturers. Using a steam mop is one of the most common ways homeowners unknowingly void their warranty.
- pH-neutral cleaners only: Most warranties require that any cleaning product used be pH-neutral. Acidic cleaners (vinegar, citrus-based) and alkaline cleaners (ammonia, bleach) are typically prohibited or limited.
- No wax or polish products: Universal prohibition across all LVP warranties these products are incompatible with the factory finish.
- Use manufacturer-recommended products when specified: Some brands, like COREtec, recommend their own branded cleaners and warn that using third-party products may void coverage. Always check your specific product’s warranty documentation.
- Maintain appropriate indoor humidity: Most LVP warranties require indoor relative humidity to be maintained between 35–65%. This is particularly relevant in basements and humid climates.
Keep your warranty documentation easily accessible and note any specific product or maintenance requirements. When in doubt, stick to plain warm water and a microfiber mop this approach is safe for every LVP product on the US market.
Seasonal LVP Maintenance Checklist
Spring
- Deep clean: After winter, give floors a thorough cleaning to remove salt, sand, and grit tracked in during cold months.
- Check seams: Inspect for any planks that have lifted or separated at seams due to winter temperature fluctuations.
- Replace doormats: Heavy winter mats trap moisture switch to lighter spring/summer mats and wash them.
Summer
- Manage humidity: High summer humidity in Southern and Midwestern US states can cause LVP to expand slightly. Keep AC running and maintain indoor humidity below 65%.
- Window UV protection: Direct sunlight through windows can cause LVP to fade over time. Use UV-filtering window film or curtains in rooms with direct sun exposure.
- Increase cleaning frequency: Kids home for summer means more foot traffic. Bump up sweeping and mopping frequency accordingly.
Fall
- Pre-winter preparation: Place high-quality doormats at all exterior entrances before wet and muddy fall weather arrives.
- Furniture inspection: Check and replace any worn furniture pads before winter, when furniture tends to be moved around less often and damage can go unnoticed.
Winter
- Salt and chemical management: Road salt and ice melt chemicals tracked indoors are abrasive and chemically harsh on LVP. Sweep daily in winter and use a damp mop more frequently to neutralize salt residue.
- Humidity monitoring: Central heating dries indoor air in winter, which can cause LVP to contract slightly. Use a humidifier to keep indoor humidity above 35% in severely cold climates.
FAQs
Can I use a steam mop on LVP flooring?
No. Steam mops are one of the most damaging tools for LVP floors and are explicitly prohibited by most major US LVP manufacturers. The high heat and concentrated moisture can warp planks, cause delamination, weaken adhesive in glue-down installations, and void your manufacturer warranty. Use a damp microfiber mop instead.
Is vinegar safe to clean LVP floors?
Diluted white vinegar (1 cup per gallon of water) is safe for occasional use and is effective at cutting through grime and removing cleaning product residue. However, frequent use of vinegar can gradually dull high-gloss LVP finishes over time due to its mild acidity. For routine cleaning, a pH-neutral cleaner like Bona is a better long-term choice.
What is the best mop for LVP flooring?
A flat-head microfiber mop is universally recommended for LVP floors. Microfiber is gentle on the wear layer, holds moisture efficiently without over-wetting, and is washable and reusable. Spin mops like the O-Cedar EasyWring also work well. String mops are not recommended — they hold too much water and make it difficult to control moisture levels.
How do I get my LVP floors to shine again?
If your LVP floors look dull, the most likely cause is cleaning product residue buildup from wax-based, oil-based, or soap-based products. To restore the shine, mop with a solution of 1 cup white vinegar per gallon of water the vinegar dissolves the residue film. Follow with a plain warm water mop and allow to dry completely. Going forward, switch to a pH-neutral, no-rinse cleaner to prevent residue from accumulating again.
Final Thoughts
LVP flooring is one of the most forgiving and practical flooring choices available to US homeowners but only if you clean it correctly. The mistakes that shorten LVP lifespan are almost always the same: steam mops, harsh chemicals, abrasive scrubbers, and letting standing water sit in the seams.
The correct approach is straightforward: sweep daily, mop weekly with a damp microfiber mop and a pH-neutral cleaner, clean up spills immediately, and avoid the list of prohibited products above.
Tackle stains with the appropriate targeted method rather than reaching for whatever cleaning spray is under your sink.
Follow these guidelines, keep your cleaning products LVP-safe, and your floors will look as good in 15 years as they do the day they were installed while remaining fully covered under your manufacturer warranty.
The investment in the right products and habits pays for itself many times over in avoided repair and replacement costs.
1 thought on “Luxury Vinyl Plank Flooring Cleaning: Stop Cleaning Your LVP Floors Wrong”